Sunday, July 26, 2015

An Alignment Scouting Trip


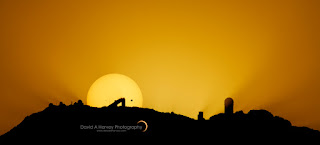
Most photographers are affected by the work of others. Whether consciously or unconsciously, you can see the results of others and modify techniques to use as your own. My friend and fellow blogger David Harvey, now gone for nearly 3 years, served as inspiration from his work and support from his comments on my own posts. Disguised as a mild-mannered software engineer, his real talent was photography, and he would likely be glad to know he still serves as inspiration from a shot like that at left - taken of the Venus transit of June, 2012, only a few months before his death from stomach cancer. An incredible shot, it is actually a composite of multiple exposures, one with the image of the sun with the black disk of Venus silhouetted against it, the second of the mountain profile of Kitt Peak National Observatory a minute later showing the crepuscular rays from the telescope domes. I like to think too that his idea to chase this shot came from my annual forays up Mount Lemmon to chase the sunset silhouette over Kitt Peak every Winter solstice. You see how it works - we all can learn from somebody!  David's blog is still on the air - it is well worth your time to spend a few hours perusing his efforts in the above link.

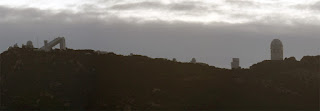
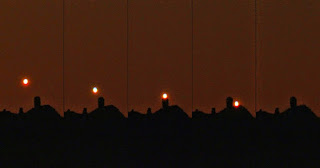
Which leads us up to the present. In a couple weeks, Venus will again be at inferior conjunction, passing between us and the Sun. No transit across the face this time, in fact, it passes over 7 degrees south of the sun on 15 August. But even as Venus passed into the evening sky last Winter solstice, I had the idea to chase the crescent Venus over the Kitt Peak profile. At that excursion, Venus was shortly past Superior Conjunction, showing no disk or crescent, only an overexposed blob in the longer exposures needed to show the Kitt Peak domes, shown at left. Here, taken at 10 second intervals, Venus set behind the Observatory, here 55 miles away. Here we are, 8 months later at inferior conjunction, and the much larger crescent of Venus has a chance of being recorded over the Kitt Peak skyline!
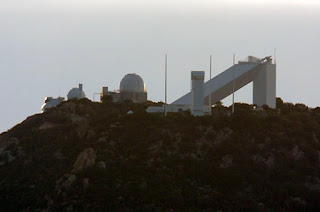


Dave's shot above shows what the size of Venus will display - since as it transits, it will be about the same size as inferior conjunction on the 15th. It should be a reasonable thing to record if the right spot can be found to set up. With that as motivation, Melinda and I hit the road last evening for a location scouting trip. Fortunately, south of the town of Three Points, there is a mostly north-south road with a good view of Kitt Peak to the west. I took a guess and set up at the turnoff to TR Ranch road about 15 miles south of Three Points. While the overhead sky was clear, there was a cloud behind the profile of Kitt Peak (of course!). And shown at left is a 4-frame panorama of the profile, taken with the TEC 140 telescope (about 1 meter focal length, 1,000mm). Only about 12 air miles away, good detail atop the mountain can be seen - witness the dome complex at left side of the above profile, here taken with the TEC with a 1.4X extender.
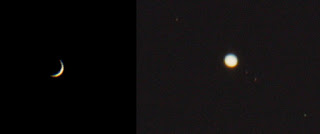
The image at left here showed our situation. Venus and Jupiter are still close together in the sky, now separated from their sub-degree conjunction what, almost 4 weeks ago. But the silhouette of Kitt Peak appears between them. From this exposure, I can guess where I should be later, depending on the motion of Venus. As the planets sank into the cloud bank, it looked as if the midpoint would have been right over the mountaintop. 

Of course, despite the compulsory visit from the Border Patrol (accounting for about 80% of the evening traffic on this road), I got some snapshots of other targets. At right are shots of the crescent Venus (single shot, 640th second exposure) and Jupiter and its 4 Galilean moons (3 frame stack, 10th second exposure). Both are at full camera resolution, so relative sizes are maintained.

And, of course, with the waxing gibbous moon high in the sky - I had to take an image of that too. With the 1.4X converter, the moon wouldn't quite fit in the field, so I took two offset frames and combined them in Photoshop, resulting in the image at left. It came out nicely given single exposures of 400th second each. Stacking frames would improve things, but since this was a fixed tripod, a tracking mount would ideally be needed.

And, of course, with Photoshop out and warmed up, it was easy to simulate what Venus setting over the mountaintop might look like! At right is an image of Venus and an image of the south end of Kitt Peak overlaid on the same scale. Since I don't want to cause confusion, I've overlaid a label that this is a Photoshop creation, and not an actual single frame, which is ultimately my goal. It looks like a crescent moon hanging over the domes, but with a telescope from 12 miles, there is a chance of realizing something close to this.

There are 2 big problems to overcome. First, the composite image of the mountain was a .4 second exposure, and that of Venus was an 800th second. A properly exposed Venus requires a short exposure, so the solution to that is to take the image much closer or at sunset where there is more light. This will happen in a couple weeks closer to inferior conjunction. A close examination of Venus shows some atmospheric dispersion, which is normal, and would likely be a little greater in an actual single exposure, since this was taken when it was higher before disappearing into the cloud.

Likely the bigger problem is the time of year. In a couple weeks we're still in the middle of monsoon season, our cloudiest time of year, and the chances of clear sky are slim, particularly on a particular night. In addition, another scouting trip to verify an observing spot more accurately is needed - requiring a second clear night. Still possible, but chances might be better at the next inferior conjunction - that would be the end of March, 2017...

Wednesday, July 22, 2015

Fleeting, Questionable Fame...

We all want to be loved... Writers want to be read, and I guess, since I'm a blogger, it is nice to know that my small efforts on this corner of the Internet are read and enjoyed. While is nice to be really popular, I'd likely continue on this blog just for a diary and photo album for personal use even if I were doing it just for me!

I don't know if you've noticed way down on the bottom of the page, long ago Melinda put in a "Feedjit" live traffic feed. If you click on the "real-time view" at the base of the display, it will reveal the last 50 people who have been on the site. Since 99.9% of our readers never leave a comment, I sometimes peruse the traffic feed to see what people are looking at. I don't know who the actual people are, but it tells the town of the Internet Service Provider (ISP), operating system, what browser software folks are using, country of origin, that sort of stuff. I can tell when sister Kathy is browsing the blog as we don't get a lot of readership from Wheatland, IA! It also tells if the readers came directly or found us via a Google search (Google uses BlogSpot for content on their searches). In a "normal" traffic day, the bottom of the "Feedjit" page might be someone from 24 hours previously.

But lately the blog has been fleetingly popular! The chart at left shows an example, showing our daily traffic from the last month. The first big peak on 7 July was from my post about the earth passing aphelion, and comparing the sun's image from aphelion/perihelion. I had gotten the idea from Mr Bad Astronomer, Phil Plait back when he posted about perihelion last January. So I sent him a link to let him enjoy. Well he posted the link on his Twitter feed, and for a day the bottom of the "Feedjit" page was like 25 minutes earlier instead of 24 hours! I don't do the Twitter, but from those thousands of hits, no one left comments, but still - nice to be read and hopefully enjoyed!

The second peak is from another reference... While I consider myself sort of a scientist, this source of "fame" is from what appears to be a conspiracy/UFO website. They reference an old post of mine where I imaged some geosynchronous satellites 2 years ago. But in their post the satellite images are used as an example of "Chimera implant stations"... What is interesting to me is that this sort of nonsensical posting is evidently extremely popular, as you can see it shot our readership up for several days, and we're still seeing traffic literally from around the world! And besides the above English site, there are also mirror sites in Spanish, French, and I've seen a Greek site as well, all carrying the link to our blog.

So I'm a little torn - I enjoy that folks are reading the blog, but would hope the readership enjoy it for the science and nature aspects of it, not as support for whacky theories. It that too much to ask?!

Monday, July 20, 2015

Old Business at the Mirror Lab

It has been a while since posting about work at the UA's Mirror Lab. For one thing, it has gone through a name change! It will now be known at the Richard F. Caris Mirror Lab - named for an Arizona businessman who recently made a 20 million dollar donation in support of the UA towards the Giant Magellan Telescope (GMT). Richard Caris founded the company Interface Advanced Force Measurements, which makes load cells for industrial applications, including the supports for the polishing and telescope cells - used in the lab for decades. We're still getting used to the name change, but eventually we'll get past calling it the Steward Observatory Mirror Lab any more, which we've known and used for 25 years!

The other big news is that we finished another mirror! The Large Synoptic Survey Telescope (LSST) will revolutionize astronomy in so many ways. It utilizes an 8.4 meter mirror, but there any resemblance to previous project ends! While the outer part of the mirror looks normal, the inner part is hollowed out to a much steeper curve - yes, a second curve on the same mirror substrate! I've seen it done on small substrates, but nothing on this scale. Doing it this way assures that the M1 and M3 curves will always be in alignment in the 3-mirror system. At left is the optical layout of the telescope, showing the 2 curves on the primary mirror. The unusual primary is just the start - it has a huge mosaic of solid-state imaging chips at the focus, allowing a 3.5 degree field-of-view (7 full moons across!), unheard of for such a large telescope. The wide field will be used to cover the entire sky every couple days to search for anything that changes with time - comets, asteroids, variable stars/galaxies... It is predicted to be a real game-changer, making data publicly available immediately on-line. Go to the link above for more images and info on the LSST project.

We actually finished the primary mirror last Fall, but then, as normal for a large mirror, we did metrology, measuring it 6 ways from Sunday through the end of the year, then finally boxing it up and shipping it to a storage facility when it was finally accepted in May. Way back in February, we were given approval to give it a protective coating and start preparations to box it up. I took a series of images that made it into a time-lapse sequence. Asking permission to post it, I was asked to wait till acceptance negotiations were complete, but since there have been newspapers articles about the mirror completion, as well as the move out of the lab to airport storage, I figure I can now post my few images! At left is a shot of the finished mirror, showing the two curvatures in the uncoated mirror, still on the Large Polishing Machine (LPM). The crew is assembling in the background to apply the "Opticote" protective film. At right they are applying the liquid while another crewman used a roller to spread it out to a thin, even coat. Because there are solvents in the liquid, everyone must wear forced-air respirators. Since I have a beard, I've had bad luck with respirators, so couldn't be in the room. I set up a camera to run automatically, then took a few shots from the second floor before I left the building. The shot at right shows them starting work on the inner curve. Note that we often walk on the finished optical surface in stocking feet as shown here.

Once dry, the Opticote surface protects the precision surface with a thin plastic layer. We use an array of suction cups to lift the mirror out of the polishing cell to place it in the transport box, and that layer keeps any dust from scratching the polished surface. When we want the glass to be exposed again, it peels off easily, any remnants can be quickly cleaned off with a little acetone. At left, the coated mirror sits on our test tower, with the edge of the mirror pressure washed to remove remnants of polishing compound visible in the above image. Some of the steelwork structures over the mirror are used for various aspects of measuring the optical surfaces in the lab.

So anyway, on that Saturday back in February, I set up my camera to take an image of the crew every 8 seconds. Assembled into a time-lapse sequence, it makes an interesting clip showing the 70 minute process that marks the conclusion of work on the project. Note however its move to airport storage is not permanent - when the telescope cell is finished, it will return to the lab for continued testing before boxing up again for transport to Chile. So we were glad to see it go, but it will return once more before leaving permanently... Here is the Opticote clip - go full screen and HD if you can!


Wednesday, July 15, 2015

While Cooling My Heels...

In the last post, I told the story of chasing down the (Dwarf) Planet Pluto from the back yard last weekend with the C14. Pluto wasn't in a great position for observing till a little later in the evening, so was looking for other projects to come to mind. Well, Saturn was sitting right there on the meridian staring down at me, so decided to do something with that. While playing peek-a-boo with clouds, the temps stayed warm, and the air muggy and I never got very good shots of Saturn itself, but with a few second exposure, the moons of Saturn were easily recorded. I ended up taking a series of exposures every 30 minutes for just over 3 hours starting at 8:20 (12 July, 0320 UT). I took a series of 2.5 second exposures, then for grins took some 15 second exposures as well. Turns out I used all of them, stacking them together for a single image for each of the 6 time stamps. Unfortunately, one of my 30m samples was completely clouded out...

Once all the images were taken, I wasn't sure what to do with them... Since Saturn is nearing the Milky way, immediately obvious was a number of stars as well as the planet and moons. I tried aligning on a star, but unfortunately, picked the moon I think is Iapetus, and got a weird stacked image. At left is shown a proper stack referenced to an actual star. Saturn is, of course, the way-overexposed oval in the center. While it is obvious that the planets move slowly across the sky, I was surprised to see how much Saturn and moons moved during the 3 hour observation period! Each of the moons appear as a series of points as their motion carries them along relative to the stars...

Again, how to display them and show the dynamics of the system... After finding the gif software for the last Pluto post (a free download called PhotoScape), that seemed to be a natural. I first made a sequence as above, aligning all the frames on the star at the lower edge below Titan. I decided to use the images at full camera resolution, just showing the inner 6 moons. This first gif is shown at left.

After showing it to a couple friends for feedback, one suggested centering on Saturn, since that is what the moons were circling. He thought the motion of planet and moons relative to the stars was a distraction. So I worked on that tonight. Unfortunately, most stacking routines won't automatically register on an extended object like an overexposed image of Saturn, and I wasn't smart enough to do it manually. Fortunately Nebulosity has an automatic non-stellar alignment, and it worked ok, but not great. It is shown at right with a little jerkiness, with a couple labeled frames included for identification... I liked the effect, but would like some better images, perhaps on a future cooler night.

Anyway, another fun project - am already looking forward to next June during an opposition night when the coverage could be at least doubled or more.

Monday, July 13, 2015

Spotlight on Pluto!

For likely the last time in our lifetime, in less than 24 hours, a space probe will be visiting an unexplored planet for the first time. Tomorrow morning, New Horizons will pass a few thousand miles from the surface of our "ninth planet" Pluto. Even though it was demoted to a dwarf planet about 10 years ago, wife Melinda is sitting across the room and she wouldn't take kindly to calling it anything other than a planet!

The first thoughts of "Planet X" came from observed perturbations in the orbit of the outer planets in the late 1800s. Percival Lowell started the first extensive search from Arizona's own Lowell Observatory in Flagstaff. Hired to do the search was Illinois-born and Kansas farm boy Clyde Tombaugh, who eventually located Pluto in February, 1930. At the time, it marked the outermost, mysterious edge of the solar system, forty times the Earth's distance from the sun at over 3 billion miles (4.5 hours for radio signals to reach Earth from New Horizons!).

My first exposure to it was when I was hired as an observing assistant at the University of Iowa's 24" telescope in 1973. The previous year it had been observed by graduate student Linda Kelsey as her master's thesis, and I remember observing it visually a few times over my years there. It is a non-trivial object to observe - it is faint, about 100 times too faint to be seen in binoculars, and as a planet, it also moves. This combination means you need very good finder charts and a decent-sized telescope. Fast forward to about 20 years ago and with a borrowed 16" telescope and good finder charts, I followed it for a couple nights, showing it to the public at the Grand Canyon Star Party. But, of course, it only looked like a faint little star - only identifiable as Pluto from its motion from night to night.

Then fast forward to now. With Pluto in the news and a break in the monsoonal circulation, I decided to set up the C-14 in the back yard to try imaging it. The weather cooperated Friday and Saturday, allowing me to obtain images over an hour for each night (dodging clouds each night too), using the finder chart that Sky and Telescope provided a month or two ago. Given the light pollution in the Midtown area of Tucson, I wasn't sure what to expect, but I was barely able to starhop to where I thought the field was and took 3 minute exposures. With the temperatures in the low 90s, I used in-camera noise reduction to reduce my hot pixels, so it took an hour to take 10 of those 3 minute exposures each night. In the cropped images above, knowing now where to look, you can see the slightly blurred image of Pluto as it moved nearly 4 arcseconds in that hour.

Otherwise, I was unsure how to display the movement from night-to-night, so I have 2 possibilities, both presented here. At left I used the method I use to make anaglyph 3D images (though this doesn't make a very good 3D image!). I rotated and aligned the stars atop each other, then do the little Photoshop magic, making one image of Pluto Cyan (11 July, UT), the other red (12 July). In the image at right, the images were nearly aligned, but keeping the stars as close doubles. The singular images are the pair of Pluto images. The high temperatures and light pollution resulted in some color gradients, but otherwise I'm surprised how apparent Pluto appears in these shots from town. These images show nearly the entire frame from the C14 telescope with the APS sensor of the Canon XSi - in case you haven't spotted the images of Pluto, they are down in the lower left corner.

EDIT: After reading John's comment below, I rethought my plan not to make a gif to display the image pair. I thought I'd lost my gif-making program in a disk crash, but found another program to do it. So here it is at right, the two images blinking back and forth, just as Clyde Tombaugh discovered them (with his blink comparator) back 85 years ago. And John was right - it is a pretty dramatic demonstration of showing the motion over the course of 24 hours. As mentioned above, there is a significant gradient between the images, likely caused by shifting the field the second night to better center on Pluto.

 It was cool to be able to image it with my own equipment in the light-polluted environs of Tucson. What is also interesting is that the nearly 90 arseconds/day of motion against the distant stars (about 3 weeks of time to move the distance of the moon's apparent diameter!) is NOT due to Pluto's motion, but rather the rapid motion of the Earth in its inner solar system orbit.

So New Horizons will have its closest approach about breakfast time Tuesday, but it will be too busy taking data to send photos back in real time. I read that only one percent of the close approach data will be sent back immediately, the rest coming in over the following weeks and months. The other fact is that it is moving so fast to get there in a reasonable length of time (only 9 years total travel time), it will zip past it very quickly, about 9 miles per second. This will be no orbital mission, but rather a flyby that won't last long... Once past Pluto there are thoughts to pass other Kuiper Belt Objects, but I don't believe that has yet been yet finalized.

Until now, images have been released pretty much as soon as they come in and interestingly, amateur data reducers can manipulate the images and release them as fast as NASA! For instance, this afternoon, I found a couple stereo pairs (Using the cross-eyed method) assembled by Bill Davis of Oklahoma City, shown at left. I found this on the Spaceweather website, which for now also includes a Pluto gallery. To see the images in 3D, cross your eyes slightly to view the left image with your right eye and vice versa. You should see a center image that displays Pluto as a round globe. Another of my favorite websites would be that of Emily Lakdawalla, who blogs regularly about various spacecraft missions, and should be a regular read for anyone interested in the solar system. She provides the right amount of technical data and interpretation in normal language that is easy for most to understand.

And, of course, the New Horizons mission has its own website, so you can check it for the latest data yourself! Have fun - we'll learn some spectacular things the next few days!

Sunday, July 12, 2015

Keeping Astronomer's Hours...

A break in the monsoon circulation late last week had allowed me to set up the scope in the back yard for some astronomical projects, for an upcoming post! But while you think the summer nights in Tucson are dull, when humans retreat inside to their air conditioning, you would be wrong! When carrying scope parts into the yard from the van (where they usually reside), I found lots of distractions from my project.

While our summer monsoon rains have officially started, we've not gotten much moisture in Midtown. Despite that, a couple nights ago our potted Trichocereus surprised us with a bloom. It was likely triggered by the water I gave it in its pot a couple weeks ago. I've posted about it before - for such a thin, columnar cacti, it sure gives off a spectacular flower! At left is a night time shot of the flower with the on-camera flash (it doesn't even start to open until well after sunset).  And at right, as I've been doing lately, I include a 3D anaglyph, for which you will need your red/cyan glasses to see depth in the image...


Outside the front door we've got a porch light (fully shielded so as not to contribute to light pollution!), and when I look out to check for our small feral cat population (we don't put out food unless the cats are there), I often spot a surprise! Outside our security door, I see ghostly lizard shapes... You can't get much of a view through the door, so I've been sneaking around the side gate to see what we've got there. Turns out there are a colony of geckos feeding on the insects drawn to the porch light! And while Arizona does have a nocturnal Western Banded gecko, what is interesting is that these are Mediterranean Geckos - they are not native to Arizona, but likely sold in pet stores, released and live in urban areas doing just what I've observed - feeding on bugs near porch lights! These are pretty small, only about 3 or 4 inches long including the tail.

Both of these images were taken with my new technique using the close-focus of a 300mm telephoto (plus extension tubes to focus even closer). At left is a focus-stack of 2 frames that each happened to have different parts in focus (don't forget I'm shooting in the dark with the on-camera flash). The telephoto plus extension tubes weren't auto-focusing, so used a flashlight to approximate focus, and lucked out with 2 frames, with different parts in focus, without the gecko moving between them. I thought it came out great! At right is another lizard peering out from a 1/4" gap around the door frame, and the shot happened to have the eye pupil and interesting foot pad details visible. This is shown at full camera resolution "plus", where I've added about 50% more pixels to the image and added a little sharpening for another what I think is a cool image. Another comment is that both these images were of the geckos peering out from a vertical surface, otherwise the flash would have cast a shadow from the door frame. So I took the shot vertical, but then rotated it horizontally to put more pixels across the image.

The eyesight of the geckos is extraordinary! You can't be within 20 feet of them without them scampering for a crack or crevasse to hide. So I've not been able to watch them hunting for bugs. There certainly have been a wide variety to choose from, but I suspect that a 3" gecko can't eat something approaching it's body size! At this phase of the monsoon season, I've seen 4" long palo verde beetles (and rescued a few from the feral's water bowl), June bugs, and a few cicadas too. I like to image anything that will hold still, and cicadas are great for that - interesting in the close-up view and mild mannered enough to pose for minutes at a time. What is not to like - their little grappling hooks for feet, whisker-like antennae, bug-eyes and 5, count-em' 5 eyes! And, of course, another 3D anaglyph image shown at right...  I think these are Diceroprocta apache, the apache cicada...

So there is some interesting stuff going on if you leave the cocoon of A/C.  Of course, my little astronomy project was to do that, but these other goings-on served as distractions too.

Tuesday, July 7, 2015

Happy Aphelion Day!

So did you notice that it was a little cool yesterday, perhaps compared to last January? Well, of course, those of us in the northern hemisphere would of course say no, it was colder last Winter. But yesterday the Earth passed aphelion - the point in its orbit farthest from the sun. I noted last January that we were passing the near point, perihelion at that time. The elliptical nature of the Earth's orbit is a little over 3%, but is not responsible for the seasons. It happens to be warmer near aphelion for us because in the northern hemisphere, the sun is shining more directly down on us and for longer days. It happens to be cooler when we're closer to the sun in Winter because of the shallower angle of sunlight and shorter days - again, in the northern hemisphere. The image above was taken of the sun this afternoon, and shows part of the disk at full camera resolution through the TEC 140 telescope.  North is approximately up, and shows active region (AR) 2381 that is transiting the Sun's disk now.

Since I used the same camera and telescope combination last January, we can compare the apparent change of the Sun's diameter. I've never seen this demonstrated, though I did it for the Moon last year. In that case, the difference in the moon's size between apogee and perigee is 14%, so is much more dramatic. In the case of the Earth's orbit around the Sun, 3.4% is much less dramatic, but easily visible here at left. By chance there happened to be active regions at the same solar longitude when both images were taken - AR 2381 in the top image taken today, and AR 2253 on the bottom image from 3 January. An alternative display is shown at right, where both were aligned in Photoshop with an opacity of 50% so both images can be compared, around their edges anyway...

I was actually a day late in my aphelion imaging session, though yesterday was a much cloudier day without much chance to image and the difference of a day doesn't amount to much, distance wise... Rounded off to the nearest 1000 miles in the left image, they reflect both the aphelion/perihelion distances and the distance when the images were taken...

Even though the change in apparent solar diameter is small, it was neat to see the difference. While the Moon's change in apparent size might be detected by eye over the course of a couple weeks, you have to go search for the Sun's change - not a readily observed difference!

Friday, July 3, 2015

More of my Illinois Bug Buddies!

I'm way behind in posting stuff - life just doesn't allow you to catch up sometimes! Last Summer I posted about some of the amazing insect life I followed day to day in our Midwest stay. Same with this last trip - most anytime there was a spare moment, grab the camera and macro and beat the bushes to see what you can see!

However, a new wrinkle this trip - I brought the new-to-me 300mm lens I got last winter. The interesting thing is that it focuses down to about 4 feet, and the combination of close focus, long focal length, and autofocus and image stabilization, it is a powerful platform to chase down shy subjects like dragonflies, butterflies and the like. It was time to put it to use. And since the intent was in chasing down small game, I gave up the infinity focus and added another 15mm of extension tube, so that it would focus from about 2 feet to 15 feet - a great range.

I think the first day of our trip, a modest search revealed a common whitetail dragonfly in our day lily patch, shown here at left and close-up at right. While you might ask why it's tail isn't white, it is because it is a female! Taken with the 300mm, it provides plenty of detail, the limitation being the narrow depth of focus of the telephoto, but similar issues would be apparent with the 100mm macro too. Since the 100mm macro doesn't have image stabilization (IS), I felt the 300 w/IS from the monopod was a great combination as demonstrated here. About the limiting factor was the wind blowing plants and insects, as the IS does nothing to help you there!

In more images with the 300mm, I was searching a patch of prairie near the Fox River, and some motion in the tree got my attention - a pair of Eastern Chipmunks! Here, only the one in the foreground is in focus, but the dark shadow in the rear is another. They thought by holding still they would stay concealed, but all that happened this time is their portrait was taken. Note that in most of these images, the on-camera flash was used to help illuminate the shadows a little. Another target at right is a male Eastern Forktail Damselfly. It is easy to image prey like this while they are distracted feeding - in this case, a large fly or bee of some sort. I really liked the contrast of the green thorax and spot of blue at the end of their tail.


Of course, I used the 100mm macro too. Anyone who follows the blog for my nature shots knows I like the effect of raindrops on leaf surfaces - where they act like little magnifying glasses. On one rainy morning, once the worst of the showers stopped, I walked to the back of the house to a redbud tree where the raindrops were beading up nicely. The flash perhaps lit up the drops too much, but I still like the emphasizing effect the flash provides. In the image at right, I also like how the drops congregate in the veins of the leaf...


Continuing with the 100mm macro, at left is one of the few insects from last year I was able to locate again - the Brown Marmorated Stink Bug (BMSB). Looking at the link above gives more information, but is a pest unknown only 15 years ago, but imported from China is now a widespread agricultural pest. Here is a head shot (single exposure) to go with last year's rear-angle view... I like the red eyes, as well as the secondary eye spots above them. They are slow movers, and I've never enjoyed their "stink bug" attributes, so for now, I like 'em!

And to dissuade you that I know everything about everything, I can't identify everything, believe it or not! At right is a dragonfly that for the life of me, I couldn't identify... There are a number of yellow dragonflies, but not with clear wings, nor with tan coloration near their heads...


More mystery objects, at left is another unknown, though it shows similarities to a squash bug. This is the second picture of it - the flash of the first must have scared a little poop out of it! At least it left me a little surprise for the subsequent pictures. I think the red eyes and shoulder horns are sooo attractive!

And at right another damselfly I couldn't find, but is attractive enough to include in a post on macro shooting in the yard... The banded structure down the abdomen is quite striking, yet didn't see anything like it on the Google images...


And while we're at it, I was able to get a couple 3D macro images too! Mostly these are done with small baselines, much less than eye separation. At left is an interesting seed pod that had interesting structures that I thought would look great in 3D.

And at right is a closeup 3D shot of the common whitetail dragonfly seen above. It was content to pose, so I took 2 shots in quick succession with a slight offset between.

So as you can see, the close-focus telephoto seems to work great as a long-distance macro.  I'll likely continue to pack both for our future trips to the Midwest.