I love posting about the work that goes on at the Richard F Caris Mirror Lab. In my nearly 30 years there, I'm justifiably proud of the work we're doing - making telescope mirrors upwards of 28 feet (8.4 meters) in diameter is an interesting juxtaposition of steel mill technology and the finest measurements you can imagine (thousandths of a human hair). Unfortunately, I can't post about my current work (not secret, just sensitive), but the Lab is making some good progress on major projects. A couple months back, I posted about the unveil of our latest glass casting - another 8.4 meter mirror destined for the center position of the Giant Magellan Telescope. Once out of the oven, the work starts, and I've brought the camera in a couple times to document the newest glass.
Since the post linked above, as shown at left from 27 January, the outer Inconel bands have been removed, as have the outer tub walls and the soft refractories have been scrubbed from the outside diameter of the substrate. At right is a 2-frame panorama showing the long view past the central hole. The streaks are the last remnants of soft refractories that have yet to be cleaned off - which they likely were the next day! The next step is to lift the glass off the oven to start mold removal, which is encased inside the glass. The crew hadn't let the moss grow as the mirror cooled in the oven - the lifting fixture had already been assembled in advance!
When I next brought in the camera a couple weeks later, the lifting fixture, called a spider because of its spindly structure was in place on the curved surface of GMT4. Still attached to the crane, they were adjusting the individual substars to properly balance the weight between them.
The closer image at right shows each of the 6 points of the spider was sitting atop a jack stand, fine vertical motion through a screw jack and load cell with readout to measure the weight distribution of the spider. On the mezzanine level in the background, the top "cone" of the oven can be seen in its storage area. Once the spider was centered properly and the 36 annular attachment points were properly adjusted for load sharing, the next step was gluing the spider to the front face of the substrate.
A few days later and that was accomplished too! In the image shown at left, some of the annular pads can be seen with black RTV oozing out. Not shown here is a metering dispenser that mixes the 2-part RTV adhesive from 5 gallon containers and pumps it out a hose that is held in place in those holes to pump the compound into the gaps between the steel annulus and the glass. Once it hardens it will be strong enough to lift the substrate plus mold, and hold it upright in the cleanout stand for mold removal, which will take a couple months. Just the glass of the 8.4 meter mirrors weighs about 20 tons, and the weight of the mold plus hard refractories almost doubles the weight to 35 tons. But with time, as the hard refractories attached to the back of the mirror, and the soft refractories imbedded in the glass are removed, slowly the weight will drop to the glass-only weight.
So in the next week or so that they give the glue to fully cure, the casting crew will put on their hardhats and protective gear for steel construction - assembling the washout stand that will provide an environmental enclosure for protecting the mirror against thermal shock (high-pressure water is used for soft refractory removal, and in low humidity can give dangerous temperature gradients), as well as providing safe access to all parts of the mirror for mold removal. The pieces are shown at right with the handling ring in the upright position - in a couple more weeks, the mirror will be mounted within the ring and steel structure providing a cocoon of protection around it.
WARNING: 3D Anaglyphs beyond this point!
Now for the good stuff! Anyone who knows me knows I'm a 3-D stereo nut, and more and more am shooting image pairs to make anaglyph images to view in stereo. So grab your red/blue glasses and be amazed at the following shots. Some of these from above are one image of the pair, others weren't used above, but these are my favorites of those I've taken recently. Most are likely hyperstereos - where the separation between the two images are a little wider than your eyes. The stereo effect is exaggerated somewhat, but oftentimes, that is welcome in complicated structures like the spider, shown at left. The image of just the curved substrate is more subtle at right, where there is not a lot of structure to focus on to provide depth clues. In fact, I'm glad the streaks are still there as they provide something for your eyes to focus on to provide depth.
Here are a few more - at left is another before the spider was placed, but from a different perspective than the one just above. The mezzanine level is shown, though dark, with subtle depth across the mirror till the pipes and tubing on the far wall are encountered.
At right, another wide shot showing the spider in place, this time with the lights on in the mezzanine level - strong 3D effect through the spider structure and even up past the oven cone.
Wrapping up with a couple close-ups of the spider atop the GMT4. I like the view at left that shows a bare strip of glass across the entire mirror chord, showing both the hexagonal structure of the casting, as well as the lines of annular supports.
At right is a close-up of an annular support after gluing, showing the port into which the RTV was injected. If you look carefully under the center support, you can see where the RTV oozed through the annulus of the steel ring and seeped into its ID.
The casting crew is making fast progress - the place looks drastically different almost every day. I'll try to keep up in some documentation, including the 3D if you enjoy them - comments always welcome! I'm thinking about a bulk purchase of the anaglyph glasses, so do let me know if you don't have them, or would like me to find some for you...
We're glad to see you here! Come and share our daily lives with us, we welcome your company and your comments. We hope there is something here for everyone!
Pages
▼
Saturday, February 27, 2016
Monday, February 22, 2016
Five Years - I Can Hardly Believe It!
Melinda informed me this evening that it had been 5 years since our dear friend Valerie had passed. I could hardly believe it as I still think of her on a near-daily basis. I served as best man at her and Bob Goff's wedding back in the '80s, and seemingly got a lifetime of a loyal friend, advocate, and someone who was always "there" for me. Some of these photos have appeared here before, but after reviewing a few years of my photo archives, she mostly appears at the life-altering events. Of course, at left, she appears in her "Elton John" sunglasses among our "Arizona Family" who travelled cross-country to come to our Hawaiian-themed wedding in 2008. She was fond of the large glasses - I perhaps wouldn't recognize her without them! At right she was eating a meal with us in Charleston, SC, where she and buddy Roger accompanied me to scatter my first wife Vicki's ashes in Charleston harbor with the Quave family in 2005. It seems I've got lots of photos of her eating, perhaps because that is where we met socially on a regular basis...
She survived 10 years after the passing of Bob, and they were the loves of their lives! They did everything together, and after his death in 2001, she established a memorial lecture in his name at Riverside Telescope Makers Conference, an annual astronomers event in Big Bear, CA. So she was a regular there as well - at left appearing with Jack Eastman, who is nearly as crazy as he appears! We both loved RTMC as back in "the day", we knew most everyone who attended and was the social event of the year. At right is a shot of her earlobe, where she wore an outline of the constellation Orion. Her husband Bob always wanted to go to the Great Orion Nebula when he "grew up", so she always looked forward to joining him there. Once Bob Died and she was living alone, she saved up all her conversation for when you saw her - that woman could talk your ear off! Everything from politics to old stories (she had an elephant's memory - a trait she must have picked up from her years in Africa), to blunt opinions about your girlfriend - all were on the table - just about what I miss the most...
I'm haunted by a line I heard a while back - "They say you die twice, one time when you stop breathing, and a second time, a bit later, when someone says your name for the last time". It is attributed to the graffiti artist Banksy, but others have expressed similar sentiments earlier. In other words, we all exist as long as our loved ones continue to remember us and mention our names. It's certainly true as I feel she is still by our side, helping us through the rough spots in our lives. May we all have and appreciate friends like her!
Sunday, February 21, 2016
Ok, Now I'm Officially Excited!
You've got to pick your milestones carefully! The other day, our 1,000th post, was a milestone. But over the last 14 months, since getting the van, I've been carefully watching the prices of crude oil and gasoline climb and fall slowly. Seemingly the jumps are due to far-off excuses - a car bomb in Iraq, or a refinery fire in Jersey. Of course, the price can climb 20 cents a gallon overnight, but take a long time to recover. It helps that since getting the van, I record the mileage and prices along with gasoline consumption, so a record trail exists... At left is the price of gas since driving the '05 Van off the lot last year. Some of the jumps are due to buying gas outside Tucson, which enjoys some of the lowest prices around. For instance the big peak in the center is from a couple fill-ups in Flagstaff on the way to the Canyon last June. Smaller ones are from Why, AZ on the way to Mexico and the other in Willcox on a trip to Mount Graham last Spring.
So what should be the benchmark at which time I'll feel some satisfaction at low prices? I used to compare it to the price of milk, but that too is never very stable - one of the first things the store drops to an unheard-of price for a loss-leader to get customers in to buy more expensive items. And remember too that I'm as old as dirt and remember price-war prices from the '60s where it wasn't unheard of to get gas for under 20 cents! No, something else...
Finally, it came to me - since I stop in most days at Quick Trip for my "Thirstbuster" -sized 44 oz Diet Coke to bring in to work, that was my benchmark - a gallon of Diet Coke! Of course, it didn't help that they recently lowered the price for a gallon refill to $1.39 from $1.69, where it used to sit. I thought it would NEVER get down below $1.39, but before I knew it, it did! Just the other day I found it at $1.37, and it is still dropping, even though the price of crude oil has been stable at $30 for the last couple months, and half price from a year ago... At right is the listed price for a gallon of fountain soda, and believe it - some people bring in HUGE containers for their drinks, so know that folks buy them. I recall once at Circle K (a QT competitor) they once listed a 5-gallon container refill - likely for large thermos containers for Gatorade or sporting events...
So how low will it go? Who knows, but it is interesting that now that gas prices are low, the economic pundits are complaining on how hard low energy prices are for the economy. Well, for once I'm glad to see us keeping a few dollars in our pockets after filling up, or for the folks back east not spending their entire income on heating fuel. The low oil prices are an obvious ploy by OPEC to drive the US oil processors to collapse, which can't pump for such low prices. And I feel sorry for alternate fuels (solar, wind) which can't compete at these prices either. But you just know that they won't stay here for long and gas will be back up to $5 a gallon before you know it. All it takes is another Middle East war and the oil producers will get their wish again...
Saturday, February 20, 2016
Shooting Towards The High Ground
It isn't as much fun to take adventurous road trips without Melinda - she hasn't felt like straying far from home with the new chemo drug, so I'm looking for fun from the back yard! I noticed the other day on Spaceweather that the International Space Station (ISS) was to make an excellent pass tonight. In fact, it was to go within 1 degree of our zenith - right over Tucson! The map is shown at left - it was to move from the NW down towards the SE before disappearing into the earth's shadow, all this happening in a dark sky.
Normally I look for mountaintops to shoot down from - I've never tried shooting upwards with high-resolution in mind. These days lots of amateur astronomers are imaging the ISS through telescopes, some as it passes over the disk of the sun or moon, the ultimate perhaps being Thierry Legault, who developed an autoguider to keep the image stabilized for high-resolution video. I was thinking I wanted to use the TEC refractor, perhaps with a barlow to expand the image scale a bit more.
So in preparation to the pass this evening, I went through my collection of auxiliary optics, particularly Barlow lenses that I could adapt to camera use. The TEC by itself (140mm F/7 = 980mm focal length) is about 1 meter focal length, and I located a 2X from Explore Scientific and 5X Tele-Vue Powermate. I set up the scope in the front yard, where there is a partial view of Finger Rock up in the Catalina Mountains, about 7.5 miles away according to Google Maps. Shown at left are views by a 300mm lens, then the TEC alone and with 2X and 5X Barlow. While the ISS is physically larger than a football field, at 250 miles altitude, it is still smallish. From an examination of the various combos and resultant sharpness, I decided to go with the 2X Barlow. The 5X, while making the image larger, doesn't have any better sharpness (likely limited by daytime seeing in these exposures), and the resultant smaller field-of-view would likely make it more difficult to track the moving ISS. The final setup is shown at right. On the telescope side I needed to add an extender to reach focus, then the 2X Barlow, then the camera adaptor.
The ISS pass was about an hour after sunset, so there was plenty of time to check focus on the moon and a few bright stars before the Space Station made its entrance. At left is a single frame of the moon at full camera resolution with the TEC 140 with 2X Barlow. Finally the ISS rose above some clouds in the NW, and I aimed and took a few shots at 1,000th of a second, and checked the brightness - appeared about right at the ISO of 1600 (maxed out), so kept at it, tracking the best I could manually while snapping frames. As it approached the zenith, I stopped and rotated the alt-az mount manually to pick it up again as it continued SE. It was when I first picked it up after the zenith move that I got a few frames in 10 seconds and stacked three of them as shown at right here. I'm no expert on the ISS layout, but the vertically stretched objects are the solar cells, the main spar running horizontally in this image. While not much compared to Legault's efforts above, it is a fun first step. Legault uses a 14" telescope, so stepping up in size would help in larger image scale as well as keeping exposures short. We'll see...
Tuesday, February 16, 2016
Need Some Direction?
After about 5 trips to the cancer center in the last week, Melinda rewarded herself with lunch at Culver's - one of our favorite places for burgers. They appeal to us as we enjoyed them in the Midwest before they moved down to Arizona, and they do fresh and hot better than anyone. Anyway, while enjoying a snack there (I had a scoop of "Chocolate Oreo Volcano" custard - the flavor of the day!) I again noticed the striking weather vane across the street at the Altamira Apartments at the NE corner of River and First Avenue. I had vowed many times to take a picture of it - a western-themed vane showing a cowboy astride a bucking bronc. Finally getting Melinda home at 3:30, it was almost too late to go back to work, so loaded up a scope or two and fulfilled the vow to shoot it! Shown in a wide view at left, the weather vane tops a tower at the southwest corner of the apartment complex. Other than the link to the complex above, I couldn't find anything about the vane itself on line...
But it is a very nice piece of art in close-up! While it does portray a bucking bronc, the details revealed with the TEC 140 (1,000mm focal length) show a rider and mount reacting to a rattlesnake in a western tableau... And wouldn't you know, while I was shooting it from the Culver's parking lot, a bird perched on the metal desert yucca plant depicted!
And if you were wondering with all the mountains around Tucson, why there weren't any in the view, it's because the apartment complex is elevated and the Catalinas north of town aren't in the view. But moving a block or two south, brings them into the background. I figured for the shot at right, I was about 3/8 mile from the weather vane, and just under 5 miles to the mountains. Taken just after sunset, with the long focal length, I did a focus-stack - combined a shot focused on the vane and another focused on the mountains. While I know how to combine those, you will note that there is a zone within the vane where it didn't use the distant frame. So there are some fuzzy artifacts where it used the incorrect image in the combo... Still more to learn about Photoshop - sigh!
And with this one in the bag - I know where there is another! Down in central Tucson, across Broadway from El Con Mall, there is an old water tower topped by a weather vane. Also an artistic design, the water tower, built in 1929, either was used to supply water to the old El Con Hotel or the local upscale neighborhood. The 50,000 gallon tank was originally surrounded by steel girders, and when neighbors complained, it was enclosed by stucco walls, stained glass and topped with the weather vane in the '30s. Scheduled for demolition in the 60s, it was saved and upgraded. A storm in 1978 damaged the bearings for the weather vane, and it was repaired using the rear axle of a 1955 Buick station wagon! Now on the register of historic places, it is now a beloved local landmark...
So those are two of the neatest weather vanes in Tucson - if you know of others, let me know!
But it is a very nice piece of art in close-up! While it does portray a bucking bronc, the details revealed with the TEC 140 (1,000mm focal length) show a rider and mount reacting to a rattlesnake in a western tableau... And wouldn't you know, while I was shooting it from the Culver's parking lot, a bird perched on the metal desert yucca plant depicted!
And if you were wondering with all the mountains around Tucson, why there weren't any in the view, it's because the apartment complex is elevated and the Catalinas north of town aren't in the view. But moving a block or two south, brings them into the background. I figured for the shot at right, I was about 3/8 mile from the weather vane, and just under 5 miles to the mountains. Taken just after sunset, with the long focal length, I did a focus-stack - combined a shot focused on the vane and another focused on the mountains. While I know how to combine those, you will note that there is a zone within the vane where it didn't use the distant frame. So there are some fuzzy artifacts where it used the incorrect image in the combo... Still more to learn about Photoshop - sigh!
And with this one in the bag - I know where there is another! Down in central Tucson, across Broadway from El Con Mall, there is an old water tower topped by a weather vane. Also an artistic design, the water tower, built in 1929, either was used to supply water to the old El Con Hotel or the local upscale neighborhood. The 50,000 gallon tank was originally surrounded by steel girders, and when neighbors complained, it was enclosed by stucco walls, stained glass and topped with the weather vane in the '30s. Scheduled for demolition in the 60s, it was saved and upgraded. A storm in 1978 damaged the bearings for the weather vane, and it was repaired using the rear axle of a 1955 Buick station wagon! Now on the register of historic places, it is now a beloved local landmark...
So those are two of the neatest weather vanes in Tucson - if you know of others, let me know!
Sunday, February 14, 2016
Mining the Archives!
We've not been out of the house much the last week other than visits to the oral surgeon and cancer center, which generally make for boring posts, so have been reviewing some of the photo archives to see potential post material I've missed lately. So not really timely, but this one is recent...
Just 2 months ago (13 December), on my way back from watching the sunset behind Kitt Peak from the Mount Lemmon Highway, I paused at Babad Do'ag ("Bad Dog" as I sometimes refer to it) as I frequently do. About 3 miles up the road to Mount Lemmon, it has a great parking lot and overlook with a spectacular views of the Tucson Valley and beyond. It is where I've shot images like at left with Kitt Peak in the far distance in silhouette behind the lights of metropolitan Tucson.
But there are other targets, including other observatories! To the south across the Tucson Valley are the Santa Rita Mountains, with Mount Wrightson as the highest peak on the left at about 9,500 feet. Mount Hopkins, about 1,000 feet lower at 8,500 feet right in the center of the frame at left is the home of the Multiple Mirror Telescope (MMT). Originally so-named because its innovative design combined the light-gathering power of 6 individual smaller mirrors each 1.8 meters (72") diameter, now consists of a single primary mirror 6.5 meters (256") diameter. I've got a connection to it as it was the first large mirror over 3.5 meters I polished the Mirror Lab where I work. A before-and-after image of the telescope from the website above is shown at right. People ask why it is still referred to as the MMT - my thought is that most large telescopes consist of primary and secondary mirrors to get the lights to the instruments, so "multiple" still applies!
Both of the above photos were taken on 13 December with my 200mm lens - the Kitt Peak shot a panorama put together from several images at 200mm focal length. The Santa Rita's shot was a single-shot taken with the same lens set to 110mm. Mount Hopkins at about 40 miles distance, is a little closer than Kitt Peak's 54 miles from "Bad Dog". At left here is a panorama put together from 8 images taken with the Meade 80mm F/6 APO (480mm focal length). Shown at the Blog's 1600 pixel limit, you can spot the squat building of the MMT atop Mount Hopkins at right center. At left is the frame showing the MMT at nearly full-resolution. Not a lot of details can be spotted compared to distant views of Kitt Peak, but you can see how the conical mountain profile would provide smooth laminar airflow over the peak, which is supposed to provide excellent seeing at MMT. There are actually a number of smaller scopes making up Fred Lawrence Whipple Observatory near the peak at Hopkins, but they aren't visible here, since they are located on the south side on a saddle below the peak.
Finally, before leaving "Bad Dog" that evening, I took another set of images with the Meade scope in full darkness to see if I could still capture the mountain profile. Sure enough, with 30 second exposures, it can be spotted, since the profile is backlit by the light glow from Nogales, AZ another 30 miles to its south. The bright lights are either from the drag strip or the Pima County Fairgrounds near Houghton south of Interstate 10, about 20 miles away (halfway to MMT!). Interestingly there are no star trails visible, though there is a lot of extinction that close to the horizon... Even 30 seconds at F/6 failed to catch any.
This is the second post mentioning MMT or Mount Hopkins. The last was from 2009 (!) when Melinda and I took part in a star party for the public at the base camp at the base of the mountain. I've not been up to MMT in over a dozen years - might be fun to take it in again since going digital!
Wednesday, February 10, 2016
Sunset, Moonset and a Surprise Guest!
Post number 1,001, so the pressure is off - back to being mediocre! Just kidding, but if this post seems weirder than most - I can blame it on the drugs - had some oral surgery this morning, and even now 10 hours later - I still don't have much feeling in my jaw... Long story short, while flossing about a month ago, a crown popped off, taking the lil' stump with it, so need gum and bone trimmed back ("crown lengthening")for a new crown to grab on to... This post is from images collected last (Tuesday) night...
It had been a while since I've been on a photo outing, and the confluence of later sunsets these days, finishing medical appointments on time, and getting chores done early, I loaded up and headed out to Gates Pass to catch the sunset last night. Melinda held down the fort at home, and my trip west got stuck in "rush hour" traffic slowdowns, but pulled into the last parking spot at Gates Pass about 15 minutes before sunset.
With the Tucson Gem and Mineral Show in full swing, I expected a full crowd, though most of the people I talked to were local - just out for your standard spectacular Arizona sunset! With the sun still up, my first goal was if there were any 3D shots of interest. There were! Get out your red/blue anaglyph 3D glasses for these. Both were taken from or a few yards from the parking lot, they show a couple "hyperstereo" images, where the baseline was significantly more than your eye separation - in these cases 5 feet or so. The shot at left was nearly down-sun shooting into the hills of saguaro cacti, and at right, the ridgeline of the Pass with a few sunset watchers in residence. One more anaglyph down below!
The sunset finally came - a "standard" Arizona one where it was way too brilliant to look at unfiltered, even as the last shards of the disk sat atop the horizon. Shooting with the 300mm, the last little remnants are visible on distant mountains, but no green flash made an appearance.
A couple months ago, the sun would have set considerably to the left, where from Gates Pass, Kitt Peak is conveniently located. Imaged with the same 300mm lens, here the National Observatory is located. Interesting from this lower viewpoint, the 4 meter telescope is nearly eclipsed by the lower (in elevation) but nearer peak of the Coyote range, seen just to the right of the big 4 meter. Also, even though the sun had just set from my viewpoint, you can see a golden glow in the foreground - likely the still-above-the-horizon sun illuminating some intervening haze.
Here is a wider view showing the western horizon, from the sunset point to Kitt Peat at the far left. The view from atop Gates Pass is dominated by flat plains and mountain ranges that just from them. Here is the Avra Valley is an interesting sight - large square bodies of water - seen here with the glow of twilight reflected from them. I was able to talk to some folks who brought them up in conversation. They are "recharge ponds". A couple decades ago when we first got Central Arizona Project (CAP) water from the Colorado River, the water corroded pipes as the different chemistry of river water differed significantly from ground water (think - shades of Flint, Michigan!). So now, at least a large part of CAP water is allowed to percolate through the ground to the aquifer, where it is pumped and used to supply Tucson with water... Not an ideal solution for a large desert city, but there it is...
As I returned to the car for a change of gear, I noticed the lights of Tucson coming up in the little notch visible to the east - hey, another 3D opportunity! While there isn't a lot of detail visible in the cacti, I like being able to see down the canyon as it opens out into the Tucson Valley in this hyperstereo with about a 10 foot baseline.
Now it was time for the after-show! Back nearly a week ago at our Tucson Amateur Astronomy Association (TAAA) meeting, Erich Karcoschka (you gotta hang on his every word!) mentioned that this time of the year the ecliptic rises nearly vertically, and with the moon actually north of the ecliptic, here in the mid-northern latitudes, we get to see something unusual - a skinny crescent moon that "holds water". In other words, the moon is nearly directly over the now-set sun and cusps are nearly horizontal, making a cup that would hold water! Also, the just-over 34 hour moon would have very bright earthshine - seen from the moon, the "full" earth would illuminate even the dark side of the moon. Sure enough, as it darkened, the crescent appeared with brilliant earthshine, shown at left. The bright star at the very top of the frame is Lambda Aquarii.
But wait - there's more! I happened to look at Heavens-Above at their sky map to note the position of the moon and sun as they set and noticed that there would be a little "guest" next to the moon - the outermost planet Neptune! The little plot is shown at right above - it appeared to be close enough to be easy to catch, so had to give it a go!
I hadn't planned on bringing any hefty mounts for tracking with telephotos, so crossed my fingers that I could use the little Polarie tracking mount with my heavy 70-200 zoom (used for the above moon shot). Now with it set to 200mm for maximum reach, I took a few exposures up to 8 seconds in hopes of catching the outermost planet. I wasn't sure which it was at the camera, but now back at home and with the sky guide above for the appointed image time, at left the minute Neptune appears from 2.9 billion miles (4.6 billion kilometers)! You'll likely have to click the image to load the full-size view to see it well, but it is there!
And even then the show wasn't over! My friend Ken Spencer blogs a picture he takes every day. He is currently touring western New Mexico and yesterday had posted an exquisite image of the Zodiacal Light seen from the boondocks near Magdelena, NM. Since Gates Pass is sort of on the western edge of the Tucson metropolitan area, could the Zodiacal Light be seen from that vantage? The short answer is yes - I could see it visually, but wanted to try a photographic record... By the time I tracked down an appropriate wide angle lens (in this case a Canon 10-22 zoom, set to 10mm) on the tracking mount, the setting crescent moon was just sitting atop the western horizon. This 45 second exposure easily shows the Zodiacal Light - a sky glow that outlines the ecliptic plane where planets and asteroids reside, and dust from comets and ancient asteroid collisions are illuminated by the sun. You can see some signs of civilization to the west - there are some houses out in Avra Valley, and cars along Gates Pass road outline it in bright glows. Also the bright orange development is actually the "Old Tucson Studios", which from the sounds of it, was hosting some sort of banquet or function likely associated with the Gem and Mineral shows going on. Do note the earthlit disk of the moon sitting on the mountaintop and also the little light dome just right of Kitt Peak - likely from Sells 60 miles distant.
By this time I had been alone for a long time and it was 8pm - long past time to pack up and head from home - but boy, what a fun evening! Wish you had been there!
Sunday, February 7, 2016
A Milestone and Optics Phun!
A milestone and celebration of sorts today - this is our 1,000th post! Started way back in 2008, Melinda started it right after our wedding, and as she graduated to the Facebook, I sort of took it over, transitioning from everyday life to more of a science, nature and astronomy blog. Thinking about it, in those approximately 3,167 days, coming up with original content every 3 days isn't too bad! There is very little rote copying from news or events, so I'm pleased, and if you are reading this, hope you are enjoying our common journey through the cosmos!
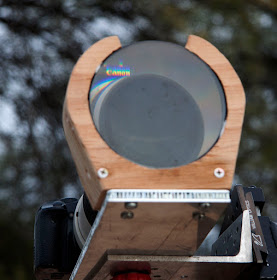
So what better way to celebrate what we are all about but to show you what you can do with a chunk of glass! I've posted some results with this prism assembly before - the first over 4 years ago with a objective prism spectra of the Hyades star cluster, and 2 years ago with a comet spectrum. It appears that I'm posting w/it every 2 years like clockwork! Anyway, with Melinda mostly feeling under the weather, I've mostly been staying at home, so looking for projects I can do from the back yard. The 4"+ diameter chunk of glass was obtained somewhere, and I polished it flat on both sides with about a 30 degree wedge in it. Mount it up on a mounting surface and you are in business. I originally built it 20 years ago (!) and first used it on comet Hyakutake, and it has been kicking around my storage room since. It is easy to use - mostly point and shoot, the only drawback being that the prism deviates the view of the object spectrum about 20 degrees, so you need to point to something you can see, or build some sort of finder for it. Mostly to this point, I'm using objects I can see in the viewfinder. The image at left shows the setup with my "newish" 300mm lens which works well with it, and the deviation I noted is demonstrated in the right image.
While the daytime view through the system + prism is a muddled mess of colors, it comes into its own at night. Even though it is well into February, the neighborhood still has strings of lights about, and these are fun to look at. From the spectra, they look like a continuous type you would expect from hot little filaments emitting at all colors. At left is the view of my next-door-neighbor's white lights. From the full spectrum you can spot one of the disadvantages of a prism spectrograph - the dispersion is non-linear from the blue to the red. While the blue part is spread out widely, the red part not so much. For that reason alone, outside objective prism spectra for wide-field surveys such as this setup, most high-resolution work at a telescope is done with diffraction grating devices with more linear dispersion... At right is a similar string of red lights a few doors down on the other side of our house. While also continuous spectra, they are likely filtered with red glass, so mostly only the red part of the spectrum passes. You can spot some of them have small leaks that permit other colors through, but mostly only the red.
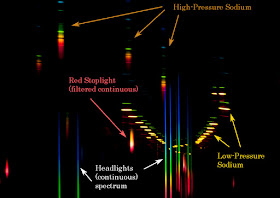
The next really cool thing to do is head down the street a couple hundred yards, looking down Mountain Avenue not far from the house. Shown at left with labels is the intersection of Mountain with the cross-street of Fort Lowell - in this case without the prism, just the 300mm lens. Identified in the image at left are 4 types of lights - low-pressure sodium dominate along Mountain south of Fort Lowell, with high-pressure lighting used at the actual intersection. Also visible is the red traffic light as well as the headlights of cars waiting at the traffic signal. At right is the view through the prism assembly, where you can see all the lights have significantly different spectra. First of all, like the colored light spectra above, the red traffic light is similarly a filtered continuous spectrum showing only red and yellow. The car headlights similar to the full spectrum continuous spectra white lights above also display all colors of the spectrum. The sodium streetlights are significantly different. The spectrum of a gas heated to incandescence make an emission spectrum - glowing brightly at discrete wavelengths. The low pressure ones that stretch down the street are very nearly mono-chromatic with a strong yellow component, with minor red and green emission lines. High pressure sodium is a complex spectrum with pressure-broadened emission in the yellow and red, along with some strong lines in the green and blue from mercury added to the lamps in small quantities. Interestingly, there is self-absorption in the high-pressure sodium at the exact yellow wavelength of low-pressure sodium emission from the outer, cooler parts of the sodium arc that re-absorbs the yellow lines.
As you can see here, and from the pictures of the setup on top of the post, the spectral dispersion is vertical. From the back yard, I was thinking that if the stars were bright enough, shooting on the meridian, the east-west motion of the stars (in a standard 8 second exposure)would broaden the spectrum allowing spectral lines to be seen. And it works! With stars, their interiors act as hot sources that provide a continuous spectrum, but cooler gasses in their atmosphere absorb discrete wavelengths that indicate what elements and to some extent, how much of the element is present. Shown at left are the 3 stars of Orion's belt, cropped somewhat so that the absorption lines can be spotted. Since these are very hot "B" stars, they don't have many absorption lines - only a few simple element's atoms can exist at such temperatures. So mostly just weaker hydrogen lines are seen. At right are a pair of stars in Canis Major - In this case, I've turned the spectrum pair 90 degrees CCW so the dispersion is along the long dimension of the image to better see the absorption lines (north is to the left here). The upper star is Epsilon CMa, the lower Sigma CMa. The lower, fainter star is a supergiant over twice as far as the hotter, nearer star, but many more lines can be seen in the cooler atmosphere, where more elements can exist.
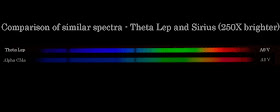
Here I compare two spectra that are very similar - Theta Leporis (A0 V) is magnitude 4.7 and about the faintest I can see visually from my back yard. Sirius (Alpha Canis Majoris) is -1.5, so more than 6 magnitudes (250X) brighter because of its close proximity to us. Shown here are 4 stacked spectral frames (8 seconds each) of Theta Lep, compared to a single of Alpha CMa. Pretty similar results, though noise is visible in the fainter star. The spectral classes are defined so that the Balmer lines of hydrogen are strongest in the "A" stars. Note how much stronger they are in these stars, compared to the hotter "B" stars of Epsilon CMa and Epsilon Ori above.
So similarly, I took a series of spectra using the device, using 8 second exposures as my standard widening width. I used the 300mm F/number and camera ISO (standard Canon XSi to fine tune exposures for bright to faint stars, using multiple exposures (up to 4) for the faintest stars. Checking with Wikipedia for spectral classifications, I then plotted up a variety of stars from hottest (top) to coolest. It was interesting to confirm the hydrogen Balmer lines are strongest at about "A" spectral class, and as you get cooler many more elements can exist (thus absorb wavelengths) in the stellar atmospheres. At the bottom (Alpha Orionis - Betelgeuse) is cool enough that molecular bands can be seen absorbing over a gap of wavelengths.
I'm still amazed that I can detect what elements can exist in a star's atmosphere 2,000 light years away - and from that and the star's brightness, you can make assumptions about temperature, mass, and chemistry - all from an inexpensive camera and simple piece of glass. Fun stuff!