Remember that nice post from nearly 3 weeks ago explaining the drug study that Melinda was going on? Well, never mind - plans have changed again... Everyone overseeing the study gave a thumbs-up, the insurance was working with the study to make sure all expenses would be covered, and we thought all our ducks were lining up when we suddenly heard that she couldn't be on Coumadin for the study. Evidently they had granted exemptions in the past for patients on blood thinners, but for some reason, were reluctant in this case. So with 5 weeks since her last treatment, which wasn't effective anyway, we were anxious to do something, so are going to another drug combo as an alternative to the TH-302 study. Evidently, the study will be a fallback if the new treatment proves less than optimal after a few cycles...
So, on Thursday, Melinda will start yet another combo, this time Adriamycin and Cytoxan. Our oncologist thinks that side effects won't be worse than some of her previous treatment regimens, though one of the side effects of Adriamycin is cardiomyopathy - it can be toxic to heart muscle cells. So she will get an echocardiogram before starting, and regular monitoring to make sure this isn't an issue in the future. Other side effects are the standard - possible hair loss, nausea, tiredness, aches and pains, etc, etc, etc - the standard list that she has fought through every time before...
So that is the plan. A single afternoon in the infusion center every 3 weeks, with blood tests before and a week after to watch her recovery. In 2 cycles or 6 weeks, she'll have another PET scan to see what effect it has been having. Fingers crossed, looking for better news!
Tuesday, March 31, 2015
Sunday, March 29, 2015
Ringy Dingy!
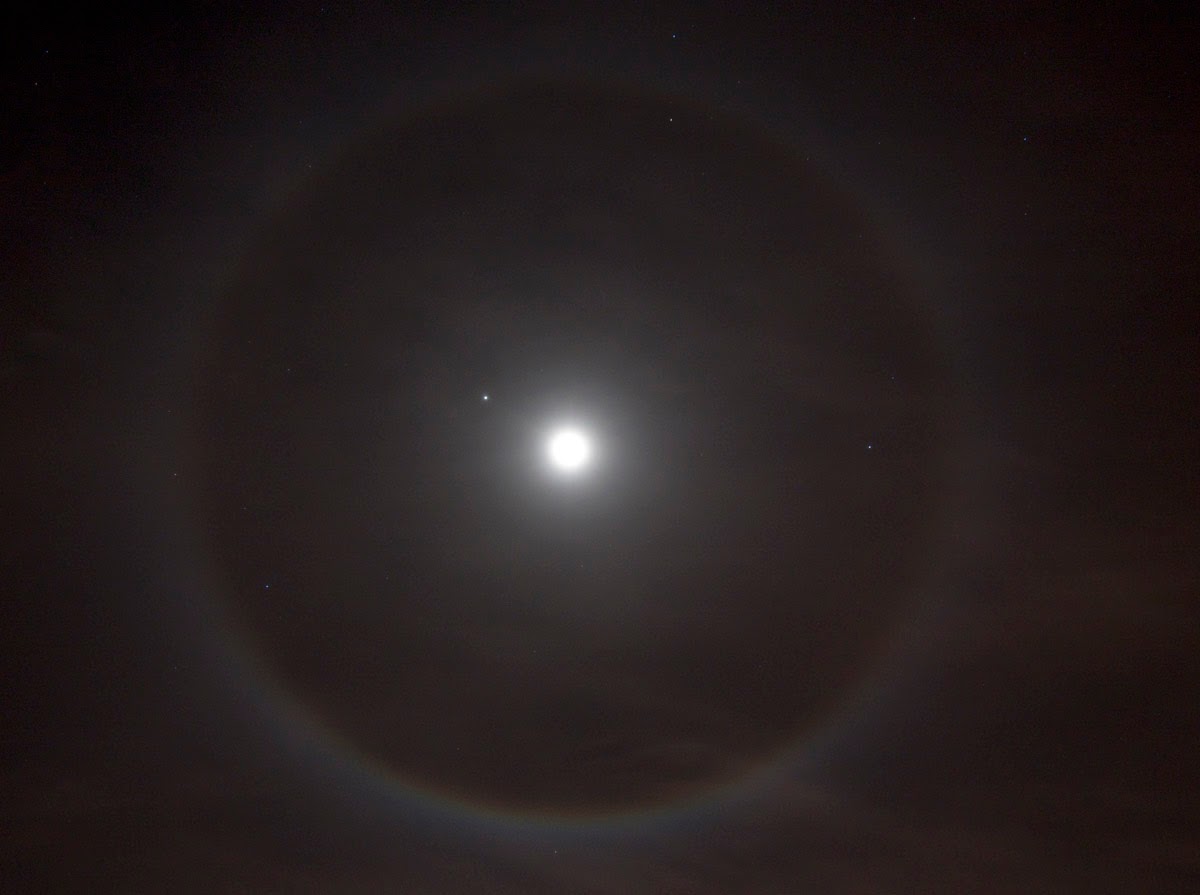
We've had cloudy skies most of the day, and also have a 10-day-old gibbous Moon tonight, so figured I had little to no chance of coming up with a blog post, but what do you know - stepped outside to pick up cat food bowls and found a really nice ring around the moon!
This 22 degree halo is caused by moonlight (or sunlight during the daytime) refracting through two surfaces of hexagonal ice crystals in the clouds. Longer wavelengths are refracted a little less, so the inside of the halo shows a red fringe. This is an 8 second exposure with wide angle zoom set to 14mm, and really approximates the visual appearance pretty well. Ain't optics wonderful!?
Fortunately it is clear enough to see a few other objects along the red-fringed ring and moon. Brilliant Jupiter is up at the 10 o'clock position from the moon, and there are a few stars too. At left just inside the ring at 8 o'clock is Regulus, the brightest star in Leo, and also just inside the ring at 3 o'clock is Procyon (Alpha Canis Minoris). At the top of the image, splitting the ring are Castor and Pollus (top to bottom), in Gemini. Just in case you can't see all that, I'm providing a labeled version at right. I lucked out to find an astronomy-themed subject tonight - yippee!
Thursday, March 26, 2015
A "New" Star in the Morning Sky!
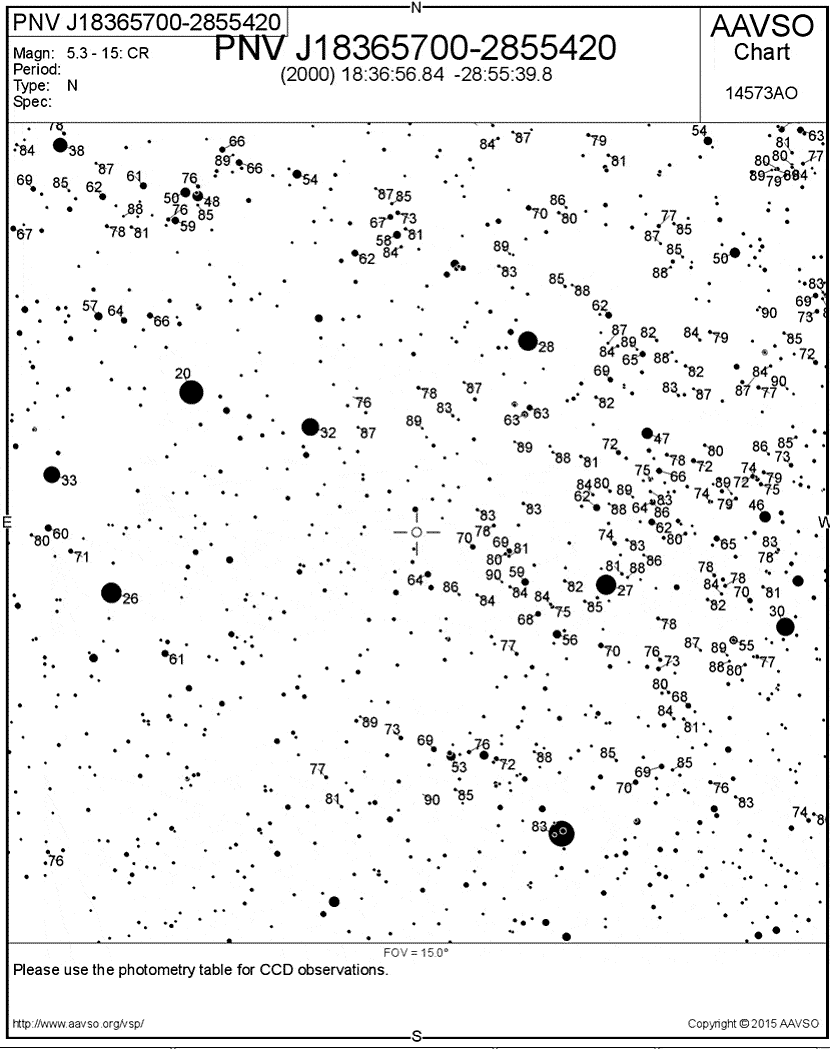
Usually at 4am I'm watching the backs of my eyelids, but recent events prompted me to step outside after heeding nature's call at that time. Recent reports of a "bright" nova in the constellation Sagittarius motivated me to try capturing it with camera and tripod. It was clear (and cool, given that the daytime highs are in the mid-80s these days), so quickly set up. I used an 85mm Canon lens at F/2 and took a few exposures at 3.2 and 5 seconds - 7 frames total, only 28 seconds total exposure. I kept the exposures short to reduce trailing and stacked the untracked images to make the image shown here. The field barely fits the asterism of "The Teapot" into the frame. In case you don't see it, I've included lines and labels in the right image. The darkening or vignetting in the corners results from shooting with the lens nearly wide open, and is to be expected, especially in a bright sky like we have in town.
Nova are caused by mass transfer in a binary star system. Hydrogen gas collects on the surface of an aged white dwarf, and when enough fresh fuel transfers, a runaway nuclear reaction takes place, resulting in a huge brightness increase - in this case about 10 magnitudes, or 10,000 times brighter than the progenitor star.
Of course these things don't last long, so get a glance while you can. Current light curves show it right on the verge of naked-eye visibility from a dark site, but will require binoculars most everywhere else. Using the "official" AAVSO map at left, you can track the brightness yourself, using nearby comparison stars where the brightness is listed on labeled stars without decimal points.
Have fun and get out there!
Ancient Photons!
These recent posts involving Kitt Peak National Observatory and infrared imaging remind me of my early days first working there, 35 years ago! As a fresh-faced farm boy transposed to the mountaintop astronomical paradise, I was entranced. At the time, we oversaw 9 telescopes and the astronomers that used them, as opposed to, I believe, just one that goes through the twice-annual telescope allocation committee meetings today... Those were pre-digital sensor days - most every telescope had darkrooms that had to be kept stocked, and refrigerated plate vaults full of not the film rapidly fading from our memory, but real glass plates of a wide variety of astronomical emulsions. As staff, we were encouraged to be acquainted with both hardware and processes, so even on my days off, I dove right into a number of projects.
One of them I briefly mentioned a week or so ago in locating the furthest point visible from the mountaintop. One of the solar astronomers had constructed a huge camera, a yard long and 12" square that used a 36" focal length (900mm!) lens that took 8X10 glass plates. Fortunately there was an ample supply of expired plates to use up, and I chose to use infrared sensitive plates with a filter transmitting so far into the red that you couldn't see anything through it (RG 780). Digging through the plates recently, I brought them to a local lab to have a couple scanned so I could show them here. At left is shown an example of the full frame on IV-N infrared-sensitive emulsion. Taken in June of 1980, it is a 10 second exposure, both because of the low sensitivity of the base emulsion, and also because of the stopped-down aperture to extend the depth of field from the nearby domes to distant Baboquivari. Of course, as stated recently, the main effects of IR imaging is darkened sky, lightened vegetation, and haze penetration. Baboquivari is a full 15 miles south of the Observatory, so it does indeed work well in penetrating haze!
What you can't see from the images is where I was when taking them... I was actually on the 4-meter exterior catwalk located outside the big dome, about 100 feet off the ground. It was one of my favorite places on the mountain so far off the ground atop the highest mountain around. Unfortunately seven years later it became the location of a horrible accident where astronomer Marc Aaronson was killed and the exterior catwalk was closed off for all access. The image at right labels the telescopes located there at the time.
Believe it or not, things change in 35 years! While two of those structures are still there, all of the scopes have changed... Shown here is a view of the south ridge from the 4-meter visitor's gallery a couple years back (no changes since then). The #1-36 was removed in 1992 when ground was broken for the 3.5 meter WIYN telescope to be built in that prime location. The "best parts" of the #1 and #2 36" scopes were combined and eventually became just the .9 meter telescope, then was transferred to the WIYN consortium in 2001. The other parts of the 2 combined telescopes, were relocated on the mountain and became the SARA Telescope (SARA- Southeast Astronomy Research Association). The "Pima Tower", an early seeing monitor for long-term Polaris observing, was removed. And at some point, the #4-16" telescope was removed, and a number of scopes in recent history were used for Visitor Center use, most recently a donated 16" on a beefy mount.
The other IR plate exposure I had scanned is shown at left. There is a miniscule overlap, but they were taken from different vantage points so couldn't be combined... Here also, there have been some major changes in 35 years - the labeled version is at right. The Burrell Schmidt, one of the most beautiful restored telescope, is just right of center and had been installed just as I started work in 1979. So when this image was taken, it was less than a year old. Originally built and installed in Cleveland, OH (!) in 1939, it was moved to a countryside location in the 50s before its move to Kitt Peak in 1979. During its move, KPNO photographic scientist Bill Schoening, an expert in auto restoration, totally stripped, repainted and re-chromed the telescope. It is still there, but converted to CCD detectors, and NOAO has given up its interest in the telescope (operated by Case Western Reserve). When I arrived the dome adjacent to it at right housed a 12" Schmidt that was unused. I cleaned and used it for a while before it was given away to another institution. Another instrument used the structure for a while, which needed full-sky access, so the dome was removed and a roll-off roof was installed. When the visitor center started their public programs, they installed a 16" telescope for use. To that dome's right, the airglow dome was removed ages ago and is now a storage shed. Looking at the newer image above, the SARA telescope is just beyond this building and houses the parts left over from the reconstructed 36" as explained above. That is a long-winded explanation of most of the changes I've seen since these images were taken...
Since these images are off 8X10 plates, there is a LOT of information on them. Cheapskate me, I didn't spring for the expensive hi-resolution scan ($25 each for these seemed high enough for me!), but there is much to be seen in close examination. Admittedly I wasn't paying attention to what was going on nearly a km away from where I was standing with the camera. But the camera captured a visitor who stood stock still for the 10 second exposure reading the signage on the 4-meter concrete mirror dummy. Also interesting is that perhaps his spouse was walking towards him from the restrooms at right - you can see the ghostly image of their feet where they were stationary for fractions of a second during the long exposure. And a little higher, you can see the US and what I think is the Tohono Nation flag on the pole near the kitchen, with the 1.3 meter dome at right. The flags are blurred from the long exposure, but also, the IR wavelengths tend to wash out even strongly colored inks and dyes. It is still interesting to me how well the individual bushes stand out on the distant ridgeline in the background at least 6 or 8 miles away! These images are shown at the full-resolution of the less-expensive scans...
Anyway, that is it for my ancient history lesson on Kitt Peak from long ago. It seems interesting that these images, which take up considerable space, are not easy to lose track of. With digital images, will it be as easy to keep track and pull up an image 35 years down the road? Given how hard it is to read a 3.5 inch floppy from 10 years ago, it remains to be seen!
One of them I briefly mentioned a week or so ago in locating the furthest point visible from the mountaintop. One of the solar astronomers had constructed a huge camera, a yard long and 12" square that used a 36" focal length (900mm!) lens that took 8X10 glass plates. Fortunately there was an ample supply of expired plates to use up, and I chose to use infrared sensitive plates with a filter transmitting so far into the red that you couldn't see anything through it (RG 780). Digging through the plates recently, I brought them to a local lab to have a couple scanned so I could show them here. At left is shown an example of the full frame on IV-N infrared-sensitive emulsion. Taken in June of 1980, it is a 10 second exposure, both because of the low sensitivity of the base emulsion, and also because of the stopped-down aperture to extend the depth of field from the nearby domes to distant Baboquivari. Of course, as stated recently, the main effects of IR imaging is darkened sky, lightened vegetation, and haze penetration. Baboquivari is a full 15 miles south of the Observatory, so it does indeed work well in penetrating haze!
What you can't see from the images is where I was when taking them... I was actually on the 4-meter exterior catwalk located outside the big dome, about 100 feet off the ground. It was one of my favorite places on the mountain so far off the ground atop the highest mountain around. Unfortunately seven years later it became the location of a horrible accident where astronomer Marc Aaronson was killed and the exterior catwalk was closed off for all access. The image at right labels the telescopes located there at the time.
The other IR plate exposure I had scanned is shown at left. There is a miniscule overlap, but they were taken from different vantage points so couldn't be combined... Here also, there have been some major changes in 35 years - the labeled version is at right. The Burrell Schmidt, one of the most beautiful restored telescope, is just right of center and had been installed just as I started work in 1979. So when this image was taken, it was less than a year old. Originally built and installed in Cleveland, OH (!) in 1939, it was moved to a countryside location in the 50s before its move to Kitt Peak in 1979. During its move, KPNO photographic scientist Bill Schoening, an expert in auto restoration, totally stripped, repainted and re-chromed the telescope. It is still there, but converted to CCD detectors, and NOAO has given up its interest in the telescope (operated by Case Western Reserve). When I arrived the dome adjacent to it at right housed a 12" Schmidt that was unused. I cleaned and used it for a while before it was given away to another institution. Another instrument used the structure for a while, which needed full-sky access, so the dome was removed and a roll-off roof was installed. When the visitor center started their public programs, they installed a 16" telescope for use. To that dome's right, the airglow dome was removed ages ago and is now a storage shed. Looking at the newer image above, the SARA telescope is just beyond this building and houses the parts left over from the reconstructed 36" as explained above. That is a long-winded explanation of most of the changes I've seen since these images were taken...
Since these images are off 8X10 plates, there is a LOT of information on them. Cheapskate me, I didn't spring for the expensive hi-resolution scan ($25 each for these seemed high enough for me!), but there is much to be seen in close examination. Admittedly I wasn't paying attention to what was going on nearly a km away from where I was standing with the camera. But the camera captured a visitor who stood stock still for the 10 second exposure reading the signage on the 4-meter concrete mirror dummy. Also interesting is that perhaps his spouse was walking towards him from the restrooms at right - you can see the ghostly image of their feet where they were stationary for fractions of a second during the long exposure. And a little higher, you can see the US and what I think is the Tohono Nation flag on the pole near the kitchen, with the 1.3 meter dome at right. The flags are blurred from the long exposure, but also, the IR wavelengths tend to wash out even strongly colored inks and dyes. It is still interesting to me how well the individual bushes stand out on the distant ridgeline in the background at least 6 or 8 miles away! These images are shown at the full-resolution of the less-expensive scans...
Anyway, that is it for my ancient history lesson on Kitt Peak from long ago. It seems interesting that these images, which take up considerable space, are not easy to lose track of. With digital images, will it be as easy to keep track and pull up an image 35 years down the road? Given how hard it is to read a 3.5 inch floppy from 10 years ago, it remains to be seen!
Labels:
IR Photography,
Kitt Peak
Tuesday, March 24, 2015
Word Of The Day!
The word of the day - anaglyph, a method of viewing 3D scenes! Those who know me also know I'm a 3D nut - there are lots of posts (29 to date!) where I've given our followers headaches trying to fuse pictures to show depth in an scene. After the flight with Chuck the other week, and a plethora of images taken as we fly along, I needed a method to show off the 3D effect, and a new method (for me) is the anaglyph method. In previous posts, I've presented the images separately to freeview them by either the cross-eyed or parallel-view method. The advantage of those is that with practice, you generally don't need a viewer. The disadvantage is that most get frustrated, and images need to remain small, and detail is lost. With anaglyph viewing, each image is tinted red or cyan, and using cheap cardboard glasses, each eye sees the appropriate image for your brain to reconstruct the image. So if you have the red and blue-green glasses, get them out - time to put them to use!
By the way, I found the method used to make these from Googling "how to make an anaglyph" and one of the top returns was "Simplest Method of Making Anaglyphs", and sure enough, it is only a couple steps, in fact, it may be simpler than the work I had to go through to make the two-image pairs previously... Since many of you may not have the colored glasses, I'll continue to provide an alternate, the cross-eyed method works best for me - when looking at the image pair, cross your eyes slightly to view the right image with your left eye and vice-versa. You should see a center image that shows depth. Try it first on the smaller thumbnails before clicking on the image for the full-size image...
First up is a pair taken as we flew past Kitt Peak National Observatory on our outbound flight, our height just above that of the Observatory. Taken a few seconds apart, our motion provided the baseline for these "hyperstereos", whenever the baseline is farther than your eye separation. Again, at left is the cross-eyed version, and at right is the anaglyph view.
I love these hyper-stereos as the depth of the scene is accentuated. Nearly each dome at the Observatory stands out and depth can be seen almost to the distant mountains.
After our flight out to western Pima County, our return brought us back past Baboquivari Mountain. It is a spectacular peak - I've had the pleasure of hiking to the top 3 or 4 times back a few decades ago. It is considered by the Tohono O'odham tribe the center of the universe and home to their deity, I'itoi, Elder Brother. Since it was out my window on the right side of the plane, I took several series of images, one of which I made into this stereo pair. Again, with the wide baseline depth details can be seen from the incredibly rugged foothills to distant mountains. Interestingly, in the anaglyph at full size, I can almost retrace the hiking route up the northern side of the peak...
On our return trip we were at about 10,000 foot elevation, so about 3,000 feet above both Baboquivari and Kitt Peak. As we passed the Observatory again, another hyper-stereo is shown, showing depth details from domes to distant canyons past Baboquivari 15 miles away. I'm really loving the anaglyphs, particularly with these B&W IR shots, since they interfere less with color fidelity, and the larger sized images retain more detail than the necessarily small individual frames for free-viewing.
So I'm looking for feedback, particularly if you have the red/cyan glasses. I'm guessing that would be the favorite way for viewing these, so since I'm boss around here, will likely continue, perhaps continuing presenting the cross-eyed view too for now.
Labels:
3-D Images,
Arizona sites,
Friends,
IR Photography,
Kitt Peak
Saturday, March 21, 2015
Look to the West!
The multi-planet alignments in the western sky at sunset are slowly coming to an end. Mars and Venus, so close a month ago, are now widely separated, and Uranus, visible next to Mars just 10 days ago, is nowhere to be seen as it appears to move too close to the sun from our perspective. Tonight, however, the moon, fresh from its solar eclipse Friday morning in far northwestern Europe, appeared tonight (Saturday) adjacent to Mars. I drove up to "Bad Dog" overlook on the Mount Lemmon Highway to improve my western horizon. I arrived minutes before sunset, and was able to barely capture the moment of sunset behind the Tucson Mountains about 24 miles away, and the saguaro cacti on the slopes of the Catalinas considerably closer. I enjoyed the view of city lights coming up as the Moon/Mars conjunction became visible.
I wasn't sure how close Mars and the Moon would appear - I was hoping to use the William Optics 11cm, F/7 refractor used for the sunset above, but once Mars popped out, it wouldn't quite fit with the 770mm focal length. Fortunately, I was prepared and brought my smaller Meade 80mm F/6 for 480mm of focal length for the view shown at left. Mars is in the lower left, and if you click the image to load the full-size view, you can also spot a couple of 6th magnitude stars in Pisces. Of course, the "dark side" of the Moon is visible because with the skinny crescent phase, from the Moon's surface, there is a nearly full Earth illuminating it. Called "Earthshine", it is easily seen during the crescent moon phase.
A little later as it got darker, I finally broke out the kit lens for the Canon XSi to take a wide-angle shot. Visible at left is the Moon/Mars pair, and also brilliant Venus above it. I went looking for the much dimmer planet Uranus, visible near these planets the last few weeks, but it has appeared to have dropped too close to the sun to spot.
There is still good reason to watch the west, though... Tomorrow (Sunday), the moon continues its path away from the sun and is adjacent to the brighter planet Venus - be on the lookout if your skies are agreeable!
Labels:
Astronomy images,
Events and Happenings
Monday, March 16, 2015
Taking Flight!
Growing up in the flatlands of the Midwest, it wasn't till moving to Arizona that I discovered mountains. They are magical places, not only cool and relatively lush compared to the desert floor, but the views from the high ground are spectacular! It is likely the closest I routinely get to flying unless I join my buddy Chuck in his plane, which doesn't happen very often. I had a little photo project to do from the air, and he was willing to oblige with a plane flight around Pima County last week. More on that project later...
I met up with him at Ryan Field, where he keeps his Maule single prop plane. While he fueled up, I figured we had nothing to complain about concerning gas prices in Tucson. While we're paying $2.21 in town, the self-serve pump at the field is over twice that!
His lil' beauty is shown at left, parked off to the side while I moved my van into his hangar and used the facilities before takeoff. If you click to see the full-size image, you will note the telescopes of Kitt Peak in the background - our flight plan was to take us out past the National Observatory, and back in past it, so you'll see it again soon. The quarters in the plane were a little cozy, but fine for an hour's flight. He often works with photographers for his "tree hugger" work, so reviewed with me how to open my window for the best imaging results. At right is a 3-frame mosaic (again, close quarters) as we're about to start taxiing.
Seemingly in a few minutes (it was closer to 15 with my nose pressed-to-window), we approached Kitt Peak. I had 2 cameras with me - the usual Canon XSi I use for 95% of the images on the blog, the other was the Canon 20D I converted to IR use a few years back. Most new cameras have good sensitivity in the IR, but most all have IR-blocking filters. In this case, the IR-block was replaced with an IR-pass filter. As a result, it has good haze penetration (with the longer wavelengths), light or white vegetation, and dark sky and bodies of water in a mostly-B&W image. Unfortunately we had some light clouds this Wednesday morning, so the sky wasn't as dark as it would normally show, and some loss of contrast towards the horizon. At left is one of the first IR shots approaching the mountaintop Observatory from the east, and about the same elevation as the peak. At right is a color image, unfortunately directly down-sun, so no shadows to speak of... You can see the haziness in the air in the distance...
That haze, showing up as bluish in visible light, is better penetrated with the longer wavelengths of IR. The image at left taken a few seconds later is a good demonstration. Mountain ranges are clearly seen off nearly to the horizon. In addition, contrast in the ground details remains high. Finally, as the last demonstration of IR radiation, bodies of water show as dark as they absorb IR. There is a dam at the mouth of "Horseshoe Canyon" on the western slope of Kitt Peak, resulting in a small lake that is used as an emergency source of water. Nearly all of the water used atop the mountain is collected and treated rainwater. In any case, the lake shows as nearly black in this image
Anyway, the project in mind... I've always wanted to know how far you can see from Kitt Peak. Of course, at night, the tongue-in-cheek answer is that you can see 2.5 million light years with the naked eye to the Andromeda Galaxy. My quest is for the furthest terrestrial point one can spot from the 7,000 foot elevation. An image seen decades ago had one of the solar astronomers identify a peak to the west as a range on Baja. I'm thinking they were assuming that Picacho del Diablo, over 10,000 feet was visible from nearly 250 miles away. Identified in a recent post from Rocky Point, Mexico, this peak has a distinctive double-peak profile, and I was hoping with the IR wavelengths and higher elevation would make it more obvious, if visible at all. An image at left from Kitt Peak, a mosaic with a small scope, I'm thinking the Pinacates were mis-identified on that old photograph. The task was to unambiguously identify these peaks and see if the far side of the Sea of Cortez could be spotted.
We proceeded past Kitt Peak and went another 25 miles a little past the reservation capital of Sells, while climbing to 10,000 feet. About 5 miles short of the Mexican border we did a slow left turn while I took a series of exposures. Assembled into an 11-frame mosaic, the Sea of Cortez was easily seen, but the cloudiness in my opinion limited visibility as far as seeing the far side. A small part of it is shown at right, and shows a better view of the above visible panorama, including better identifications of Mount Cubabi and the Pinacate range, both in Sonora, Mexico.
On our return trip we passed Kitt Peak,
this time on its northern side. This first wide view is almost directly up-sun, so not optimum conditions, but a nice perspective from a little-seen angle. From this side, Horseshoe Canyon, where the lake is located as above, is easily made out bottom center. There are radio as well as optical telescopes on the eastern ridge of the Canyon, well below the rest of the scopes atop the mountain. A better view occurred five minutes later, shown at right, just showing the upper Observatory grounds. With the vegetation showing up light in IR wavelengths, it is almost a "where's Waldo" game to find all the telescope domes hidden there!
One more comparison of the IR camera to the visible color camera can be done as we were on approach to Ryan Field to land. Taken within a minute of so of each other, the IR image was taken first, then the color image taken, showing a lot of haze - even more than I recall seeing by eye. Full disclosure though, these pictures were about the only ones taken through the front windshield... Still the difference in the view of the "Tucson
Valley" is pretty amazing!
So the task to determine the furthest point visible from Kitt Peak is still "up in the air" so to speak. I don't think Baja is visible, though if I can talk Chuck into another flight with better skies I'll be glad to go!
I met up with him at Ryan Field, where he keeps his Maule single prop plane. While he fueled up, I figured we had nothing to complain about concerning gas prices in Tucson. While we're paying $2.21 in town, the self-serve pump at the field is over twice that!
His lil' beauty is shown at left, parked off to the side while I moved my van into his hangar and used the facilities before takeoff. If you click to see the full-size image, you will note the telescopes of Kitt Peak in the background - our flight plan was to take us out past the National Observatory, and back in past it, so you'll see it again soon. The quarters in the plane were a little cozy, but fine for an hour's flight. He often works with photographers for his "tree hugger" work, so reviewed with me how to open my window for the best imaging results. At right is a 3-frame mosaic (again, close quarters) as we're about to start taxiing.
Seemingly in a few minutes (it was closer to 15 with my nose pressed-to-window), we approached Kitt Peak. I had 2 cameras with me - the usual Canon XSi I use for 95% of the images on the blog, the other was the Canon 20D I converted to IR use a few years back. Most new cameras have good sensitivity in the IR, but most all have IR-blocking filters. In this case, the IR-block was replaced with an IR-pass filter. As a result, it has good haze penetration (with the longer wavelengths), light or white vegetation, and dark sky and bodies of water in a mostly-B&W image. Unfortunately we had some light clouds this Wednesday morning, so the sky wasn't as dark as it would normally show, and some loss of contrast towards the horizon. At left is one of the first IR shots approaching the mountaintop Observatory from the east, and about the same elevation as the peak. At right is a color image, unfortunately directly down-sun, so no shadows to speak of... You can see the haziness in the air in the distance...
That haze, showing up as bluish in visible light, is better penetrated with the longer wavelengths of IR. The image at left taken a few seconds later is a good demonstration. Mountain ranges are clearly seen off nearly to the horizon. In addition, contrast in the ground details remains high. Finally, as the last demonstration of IR radiation, bodies of water show as dark as they absorb IR. There is a dam at the mouth of "Horseshoe Canyon" on the western slope of Kitt Peak, resulting in a small lake that is used as an emergency source of water. Nearly all of the water used atop the mountain is collected and treated rainwater. In any case, the lake shows as nearly black in this image
Anyway, the project in mind... I've always wanted to know how far you can see from Kitt Peak. Of course, at night, the tongue-in-cheek answer is that you can see 2.5 million light years with the naked eye to the Andromeda Galaxy. My quest is for the furthest terrestrial point one can spot from the 7,000 foot elevation. An image seen decades ago had one of the solar astronomers identify a peak to the west as a range on Baja. I'm thinking they were assuming that Picacho del Diablo, over 10,000 feet was visible from nearly 250 miles away. Identified in a recent post from Rocky Point, Mexico, this peak has a distinctive double-peak profile, and I was hoping with the IR wavelengths and higher elevation would make it more obvious, if visible at all. An image at left from Kitt Peak, a mosaic with a small scope, I'm thinking the Pinacates were mis-identified on that old photograph. The task was to unambiguously identify these peaks and see if the far side of the Sea of Cortez could be spotted.
We proceeded past Kitt Peak and went another 25 miles a little past the reservation capital of Sells, while climbing to 10,000 feet. About 5 miles short of the Mexican border we did a slow left turn while I took a series of exposures. Assembled into an 11-frame mosaic, the Sea of Cortez was easily seen, but the cloudiness in my opinion limited visibility as far as seeing the far side. A small part of it is shown at right, and shows a better view of the above visible panorama, including better identifications of Mount Cubabi and the Pinacate range, both in Sonora, Mexico.
On our return trip we passed Kitt Peak,
this time on its northern side. This first wide view is almost directly up-sun, so not optimum conditions, but a nice perspective from a little-seen angle. From this side, Horseshoe Canyon, where the lake is located as above, is easily made out bottom center. There are radio as well as optical telescopes on the eastern ridge of the Canyon, well below the rest of the scopes atop the mountain. A better view occurred five minutes later, shown at right, just showing the upper Observatory grounds. With the vegetation showing up light in IR wavelengths, it is almost a "where's Waldo" game to find all the telescope domes hidden there!
One more comparison of the IR camera to the visible color camera can be done as we were on approach to Ryan Field to land. Taken within a minute of so of each other, the IR image was taken first, then the color image taken, showing a lot of haze - even more than I recall seeing by eye. Full disclosure though, these pictures were about the only ones taken through the front windshield... Still the difference in the view of the "Tucson
Valley" is pretty amazing!
So the task to determine the furthest point visible from Kitt Peak is still "up in the air" so to speak. I don't think Baja is visible, though if I can talk Chuck into another flight with better skies I'll be glad to go!
Labels:
Arizona sites,
Friends,
IR Photography,
Kitt Peak
Saturday, March 14, 2015
Invasion of the Crane Flies!
It started a couple weeks ago - it seemed as though one of the plagues of Egypt had descended as swarms of mosquitos over 2 inches long arrived! Not only was Melinda freaking out, but even the cats were chasing the few that sneaked into the house. The local paper had a short article with an identification - they were Crane Flies, a harmless insect that appears in wet years. Since we've had a moist Winter and Spring, there you go!
They certainly don't bite, and there is some discussions as whether or not they even eat during their 2 week life span.
But even though they are harmless, having these mosquito-looking bombers flying around your head sends you swatting... Of course, I grabbed my macro lens and went a-hunting. Fortunately they stop and rest occasionally. At left is a shot showing the entire insect at our front door under our entry light. The on-camera flash was used for illumination in all the images. With the macro lens, I moved in near the closest-focus that resolved its compound eye at right.
One of the first images I took of the flies was through our sliding glass rear door. Viewing it from below at left, I noticed something interesting right away - it had a pair of stalks coming out of its abdomen near the wings, with little balls on them. They reminded me of the long poles that tightrope walkers use to maintain their balance. While the Wiki site above didn't identify the appendages, another site talking about crane flies in Texas identified them as halteres, which vibrate while in flight to provide a balance and guidance system - just what my first thoughts had been! In both this image and another on the front door from above (at right), they are quite apparent.
The wings are quite spectacular in close-up. They are gossamer-thin, almost transparent, yet have a stiffening structure embedded to strengthen them. They seem quite the marvel of engineering! While the adult insects only live a couple weeks at most, they do take a beating - note the wing close-up at left, which has suffered a puncture (marked with an arrow). Almost all careful wing examinations in my images showed similar tears and rips.
So they will be gone soon enough, but one of my nightly chores is still to dispose of the 6 or 8 that have managed to get into the house and gather around the lights in the kitchen and adjacent to the bed.
But even though they are harmless, having these mosquito-looking bombers flying around your head sends you swatting... Of course, I grabbed my macro lens and went a-hunting. Fortunately they stop and rest occasionally. At left is a shot showing the entire insect at our front door under our entry light. The on-camera flash was used for illumination in all the images. With the macro lens, I moved in near the closest-focus that resolved its compound eye at right.
The wings are quite spectacular in close-up. They are gossamer-thin, almost transparent, yet have a stiffening structure embedded to strengthen them. They seem quite the marvel of engineering! While the adult insects only live a couple weeks at most, they do take a beating - note the wing close-up at left, which has suffered a puncture (marked with an arrow). Almost all careful wing examinations in my images showed similar tears and rips.
So they will be gone soon enough, but one of my nightly chores is still to dispose of the 6 or 8 that have managed to get into the house and gather around the lights in the kitchen and adjacent to the bed.
Labels:
Arizona flora and fauna,
macro photography
Thursday, March 12, 2015
Change in Plans...
Time to bring you up to date on Melinda's cancer treatments... We saw the oncologist today, and went over the PET scan she had done earlier in the week. This is the gold standard in monitoring her small-cell lung cancer and tracking the progress of her chemo treatments. The news is that since her last PET scan, the spots she had have gotten slightly larger, and there are now more of them. Her previous scan told us her last chemo combo had stopped working, and now this one indicates that the treatments she has gotten the last couple months haven't been effective either. So another change in plans is called for...
Our oncologist recommends joining a study on TH-302, a hypoxia-activated prodrug. This drug is inert when administered, and converted to an active form through a normal metabolic process, in this case, where oxygen levels are low. The theory is that cancer tumors rapidly outgrow their blood and oxygen supply, and these areas would locally activate the drug into cytotoxins which would kill the cancer cells. Sounds great on paper! There are currently 6 patients in the study under our oncologist's care, at least 4 for more than 6 months, one for nearly a year, so it is effective in most of these cases. PET scans are done every 2 cycles (months), so if the process doesn't work or loses effectiveness, they are pulled from the study.
Even though the drug is considered "inert" when administered, there is a page-long list of potential side effects besides those normally seen in chemo warnings. The worst we see listed is a skin toxicity, both from the inside and if it leaks on the outside of your skin. There are also clotting and kidney issues, but Melinda is already on blood thinners and they are quite careful in their blood monitoring.
We need 3 weeks from her previous chemo to start, so have 2 weeks to wait - about what it will take to get the insurance company up to speed on all this. Generally the study pays for expenses not covered by insurance. And if this course of action is ineffective, our oncologist already has a fallback set of drugs to try next. We'll let you know of progress or changes...
Labels:
Cancer
Tuesday, March 10, 2015
Keeping Busy...
One of the joys of wide-angle astronomical imaging is that once the camera, tracking device and intervalometer start their work, they are quite happy running unattended. This leaves me to sit and watch the sky wheeling overhead, usually with mouth open in awe at the naked-eye view of a dark sky. Or if I had a van full of gear, I could set up a scope for viewing, but I'm normally not that organized. The other night, while imaging the "ghost comet" and current Comet Lovejoy, I had another impromptu experiment to try...
This is not an original idea - I most recently saw it on Optics Picture of the Day - an always interesting site on atmospheric phenomena, in a recent post on "Time Varying Lights". But I've seen this done even earlier. Imagine hand-holding a telephoto shot of a star for a several second exposure. The results can be interesting, as shown in the link and also here at left. The star Canopus, only a few degrees off the southern horizon, was twinkling moderately, and in its long path through the atmosphere, different colors are refracted differently, resulting in a constantly-changing, almost psychedelic light show. The short time exposure, with the hand-held wiggles added record the changing intensity and colors. I braced myself against the open door of the van to provide a little extra "bounciness" to the image. I suspect that I could have done a better job of hand-holding otherwise. If you use an image-stabilized lens, make sure you turn that feature off! These shots were taken with the Canon 70-200 lens set to the maximum.
Another 30 degrees higher, Sirius, only a little brighter than Canopus, was visible, but the much-less air path to me showed much less scintillation and color effects. Generally astronomers avoid observing near the horizon for this very reason - the atmosphere is generally a lot steadier above 30 degrees or so off the horizon. The only exception are for objects that don't get that high, like comets that set shortly after sunset, or objects that skim the southern horizon and don't rise higher...
\
By this time, the planet Venus was getting low in the west, and was displaying a nice warm orange tint. I was wondering if the same color effects could be seen with the planet's disk. Venus was actually considerably lower than Canopus, and as a result, the atmosphere had already absorbed much of the blue part of the spectrum. The color ranges from greenish into red. In addition, in comparing it to Canopus, the scintillation, the variability of the brightness was lessened by the disk of Venus, even though small. Twinkling affects the point-sources of stars much more than a planetary disk.
So of course, I had to do another planet, perhaps higher in the sky. Jupiter was conveniently placed only about 15 degrees from the zenith. Even though the zoom setting and exposure didn't vary much between objects, Jupiter displays enough of a disk that it is easily seen in the widened trace of the image. So high in the sky you would expect a minimum of color variation, and also of brightness variation. Sure enough, the only place the trace dims is when the camera/lens was moving faster.
This was a fun little 10 minute project to do while my other camera was busy exposing. Would I do it again - absolutely! Perhaps even a little more focal length would show scintillation and color even better. I've got a little 80mm Meade scope that might be perfect! Go ahead and try it!
Labels:
Astronomy images,
Atmospheric Effects,
Kitt Peak
Monday, March 9, 2015
A Couple Hours of Darkness...
Since the full moon last week, I've been waiting patiently for clear skies, and enough dark time between twilight and moonrise to get in some exposures of a few objects. Sunday seemed to be a perfect afternoon - there were some clouds well east of Tucson, and with moonrise scheduled for about 9:15, I had almost 2 hours of dark time. I loaded up the van with a couple cameras, tracking mounts, and a case of lenses towards Kitt Peak. I set up along the mountain road just past milepost 8 at about 5,500 feet elevation. Some scattered high cirrus appeared right at sunset, but it was a lot calmer than the gale from last time!
My first target of the night, shortly after it got dark, was the continuing planetary grouping in the west. As mentioned in my last post from town, Venus and Mars in the west are currently serving as guideposts to locate Uranus in binoculars between them. I was setting up a 135mm lens for my first primary object, so used it to barely fit the scene in that telephoto. I stopped the lens down to F/5.6 to give a nice diffraction pattern around Venus, and even Mars shows one at the bottom. Uranus is between them, and even if you don't know which of the points of light it is, the greenish tint guides you to it in the image. I provide the labeled version at right. In a few more days it will drop below Mars (Mars is moving away from the sun faster than Uranus), so do check it out soon!
As it moved towards darkness, I was able to align the Polarie tracker on Polaris and line up on my first target. Discovered barely 3 weeks ago, Comet SOHO C/2015 D1 is/was a sungrazing comet. SOHO, a spacecraft designed to observe the near-sun environment has also discovered 2,875 comets, including C/2015 D1. After passing 2.6 million miles from the blistering Sun's surface, astronomers started watching for it in the night-time sky, but evidently the nucleus disintegrated - all that is visible is a remnant tail!
Never having seen a "ghost comet" before, I was hoping it would last long enough that I could try capturing it, so that was the first object on my list. Fortunately, a couple websites like that last link provided a map of where to look, so started exposing with the Canon XSi and my ole' reliable Nikon 135 lens set to F/4. I wasn't expecting to see it on the screen - I suspected that the power of stacking images would be needed to be able to see something like this. Sure enough, nothing detected, but when my lucky 13 exposures were stacked at home later (22 minutes total exposure), out popped a little Cheshire Cat mustache! Shown at left is the full frame of the 135mm field and APS sensor, the remnants of Comet SOHO is bottom center. Unfortunately, the comet was on the northern edge of the Zodiacal Light, so there is a nice gradient across the field that I'm not really interested in removing as it is real...
My first target of the night, shortly after it got dark, was the continuing planetary grouping in the west. As mentioned in my last post from town, Venus and Mars in the west are currently serving as guideposts to locate Uranus in binoculars between them. I was setting up a 135mm lens for my first primary object, so used it to barely fit the scene in that telephoto. I stopped the lens down to F/5.6 to give a nice diffraction pattern around Venus, and even Mars shows one at the bottom. Uranus is between them, and even if you don't know which of the points of light it is, the greenish tint guides you to it in the image. I provide the labeled version at right. In a few more days it will drop below Mars (Mars is moving away from the sun faster than Uranus), so do check it out soon!
Never having seen a "ghost comet" before, I was hoping it would last long enough that I could try capturing it, so that was the first object on my list. Fortunately, a couple websites like that last link provided a map of where to look, so started exposing with the Canon XSi and my ole' reliable Nikon 135 lens set to F/4. I wasn't expecting to see it on the screen - I suspected that the power of stacking images would be needed to be able to see something like this. Sure enough, nothing detected, but when my lucky 13 exposures were stacked at home later (22 minutes total exposure), out popped a little Cheshire Cat mustache! Shown at left is the full frame of the 135mm field and APS sensor, the remnants of Comet SOHO is bottom center. Unfortunately, the comet was on the northern edge of the Zodiacal Light, so there is a nice gradient across the field that I'm not really interested in removing as it is real...
Doing a little cropping reduced the effect of the gradient and lets the comet stand out a bit more. Shown at left is the cropped view of the comet among the stars of Pisces. And I've done the work for you in identifying nearby stars, and even a galaxy in the field of the telephoto lens in the labeled version at right. I had the camera oriented square to the horizon, so north is towards the 2 o'clock position in these views. I've not quite recorded anything like this before, and I think it is quite amazing! If there is another chance of getting out in the next 10 days or so, I'd definitely go after it again!
To round out the night, another bright comet is still around - old reliable Lovejoy C/2014 Q2. I've posted a few times, my favorite was when I shot it passing the Pleiades when I was fresh out of the hospital with bronchitis in January. Now on the opposite side of the sky when it first moved above our southern horizon, it is up in Cassiopeia, back in the Milky Way again. It was competing a little with the skyglow with Phoenix from my location, but it is a shadow of its former self. While obvious in binoculars, try as I might I just couldn't quite make it out naked eye. But is it in a beautiful field with lots of open star clusters and even scattered dark nebula. The bright star to the comets right is Delta Cass, Arabic name Ruchbah. The image at left is only 12 minutes of stacked exposures, and stretched enough that I can almost imagine the tail stretching to the top of the frame.
Cropping the frame again allows more detail, showing ultimately how sharp the film-era Nikon lens is, and how well the Polarie tracks for the 2 minute long exposures. The exposure at left is shown at full camera resolution (no downsizing for the blog). Comet Lovejoy is passing a pair of star clusters here, the bigger one being a popular visual target. With the pair of bright stars involved in the edge for eyes, it is sometimes called the Owl Cluster. Don't see it? Excuse my photoshop drawing of an owl, but may jog your brain into seeing a bird - though my sketch looks more like a bat. Definitely needed more exposure, but moonrise was imminent, and I promised Melinda I'd be home shortly after 10pm - it was a school night, after all! But by recording these two comets, I was a happy camper!
Labels:
Arizona sites,
Astronomy images,
Astronomy-general,
Kitt Peak
Subscribe to:
Posts (Atom)
LANGUAGE TRANSLATION ASSISTANT
Pages
Click on our names, above, to send us an email!
FOR ADDED VIEWING PLEASURE -- click on the pictures in our daily posts to see an enlarged (and typically more detailed) picture!
Wow! You came all of the way from _______ to visit us?!!!
Credit where credit is due...
All photos are by Dean and Melinda Ketelsen - even the really cool astrophotography ones. Granted, some pics have come from the Internet...such as pictures of actors, or of Miss Tohono O'odham, etc. However, the astronomy pics, as well as the bird pics are all original - compliments of Dean, and sometimes Melinda too! Layout, editing, and continual tweaking (I think they call that "desk top publishing"), well, that would be the work of "I know I can make this better" Melinda!
"We like to read Dean and Melinda's blog!"
Helix Nebula
Library of Ketelsen
3-D Images
(64)
Arizona blossoms
(32)
Arizona flora and fauna
(66)
Arizona sites
(135)
Astronomy images
(216)
Astronomy-general
(148)
Atmospheric Effects
(18)
Birding
(41)
Blast From The Past!
(3)
Cancer
(38)
Comet Lulin
(5)
Current Events
(14)
Events and Happenings
(188)
Family
(91)
Focus Stacking
(27)
Friends
(134)
General
(78)
Grand Canyon Star Party
(31)
Health
(2)
Health Issues
(8)
Holidays
(18)
Home improvement
(41)
Homestead sites
(81)
Hyperstar images
(8)
Illinois Blossoms
(13)
Illinois flora and fauna
(48)
Introducing....The Ketelsen's
(2)
IR Photography
(20)
Kitt Peak
(90)
Kitties
(44)
macro photography
(91)
Melinda Ketelsen
(7)
Messier Marathon
(4)
Movies
(5)
Movies/TV
(3)
NICU
(4)
Optics
(2)
Photography general
(24)
Pluto
(3)
RAGBRAI
(16)
Restaurants
(1)
Roadtrip Stories
(232)
Space
(7)
Steward Observatory Mirror Lab
(62)
TAAA
(35)
Talks_Lectures
(4)
Telescopes
(77)
time-lapse
(30)
Weather
(35)
Wildlife
(19)
Year-end Review
(3)
Blog Archive
-
▼
2015
(105)
-
▼
March
(14)
- Change in Change of Plans...
- Ringy Dingy!
- A "New" Star in the Morning Sky!
- Ancient Photons!
- Word Of The Day!
- Look to the West!
- Taking Flight!
- Invasion of the Crane Flies!
- Change in Plans...
- Keeping Busy...
- A Couple Hours of Darkness...
- The Continuing Conjunction
- Mexico Sunsets!
- Spot The Controversy?
-
▼
March
(14)
NGC 891
Blogs We Read
-
-
-
Eruption Crowd4 months ago
-
My Orange Dinner5 hours ago
-
David has left us12 years ago
-
-
-
Stairway to heaven8 years ago
-
-
-
-
-